Welcome to another blog post in the series discussing a specific technical topic. Today, we will take on one form of communication between devices – Bluetooth technology (using Qt Bluetooth module). But more importantly, we will not be looking at the classic form, but rather Bluetooth Low Energy (BLE for short). If you have a project using this technology, I encourage you to contact us if you need Qt development support.
So without further ado, let’s get started!
Bluetooth technology – a Short Introduction
Bluetooth technology is a wireless communication standard that allows Bluetooth enabled devices to connect and exchange data over short distances. Developed in the late 1990s, it has become a ubiquitous feature in modern electronic devices, including smartphones, laptops, headphones, and smart home gadgets. The Bluetooth Special Interest Group (SIG) sets the standards for Bluetooth technology and ensures its compatibility and innovation.
Bluetooth technology operates in the 2.4 GHz ISM band and uses a frequency-hopping spread spectrum to minimize interference from other wireless devices. Over the years, Bluetooth technology has evolved through several versions, each enhancing data transfer speeds, range, and energy efficiency. The latest version (Bluetooth 5.0) has extended its range and increased its data transmission rates, cementing its role in the Internet of Things (IoT) ecosystem.
One of the key advantages of Bluetooth technology is its versatility. It supports a wide range of applications, from simple file transfers and peripheral connectivity to complex audio streaming and network building. Bluetooth’s profiles define specific use cases, ensuring compatibility between Bluetooth devices and enabling seamless interactions.
Today’s Star- Bluetooth Low Energy
Bluetooth Low Energy (BLE or Bluetooth LE, sometimes Bluetooth Smart) was developed to meet the rising demand for low-power wireless communication in battery-operated devices like fitness trackers, smartwatches, and IoT sensors. Traditional Bluetooth classic, while offering robust connectivity, consumed too much power for these applications.
BLE addresses this by significantly reducing energy usage, enabling devices to operate for extended periods on small batteries. It achieves this efficiency through shorter communication intervals and sleep modes between transmissions, ensuring reliable connectivity while conserving power. This makes BLE ideal for devices that require long battery life without compromising performance.
“Classic Bluetooth” vs Bluetooth Low Energy
Bluetooth and Bluetooth Low Energy (BLE) are both wireless communication technologies designed for different purposes, with distinct technical characteristics. Here is a detailed comparison of their key differences.
|
Bluetooth |
Bluetooth Low Energy |
| Power Consumption |
Higher, continuous connection consuming 1-3 mA |
Significantly lower, intermittent connection consuming 0.01-0.5 mA |
| Data Transfer Rate |
Higher data rates up to 3 Mbps |
Lower data rates up to 1 Mbps |
| Battery Life Impact |
More significant impact on battery life |
Minimal impact, ideal for long-term use |
| Connection Setup Time |
Longer setup time, several hundred milliseconds |
Faster setup time, a few milliseconds |
| Ideal Use Cases |
Continuous, high-speed data transfer |
Infrequent, low-speed data transfer |
Bluetooth Low Energy comparison
Usages of Bluetooth Low Energy and Bluetooth devices
I mentioned earlier that Bluetooth Low Energy is used in the IoT industry, for example, but this is not the only place where this technology is used. Let’s see where else it is used.
Industrial Automation
Bluetooth Low Energy is utilized in industrial settings for asset tracking, predictive maintenance, and environmental monitoring by connecting sensors and beacons to monitor equipment location, performance, and conditions like temperature and humidity in real time, improving operational efficiency and preventing downtime.
Medical
In the medical field, Bluetooth Low Energy is critical for wearable health monitors, medical implants, and remote patient monitoring, enabling Bluetooth devices such as fitness trackers, pacemakers, and glucose meters to transmit health data wirelessly to smartphones and medical databases, facilitating continuous and remote health management thanks to this wireless technology.
Consumer electronics
Bluetooth LE is extensively used in consumer electronics, including smart home devices, audio gadgets (like headphones), and wearables, to provide energy-efficient connectivity for controlling lights, locks, and thermostats remotely, streaming audio to wireless earbuds and speakers, and syncing data from smartwatches and fitness bands to mobile devices.
Automotive
In the automotive industry, Bluetooth Low Energy supports keyless entry systems, in-vehicle sensors, and infotainment systems, allowing secure, hands-free access to vehicles, real-time data transmission from various sensors for diagnostics, and seamless connectivity of smartphones and tablets to the car’s media and communication systems.
Internet of Things (IoT)
Bluetooth LE is a cornerstone of IoT applications, enabling smart agriculture, home automation, and asset management by connecting sensors and devices to monitor soil moisture and crop health, create automated routines for energy efficiency, and track assets and inventory in real-time within warehouses and retail environments. One device works in various scenarios. In the case of IoT, power consumption is of particular importance.
Cool Demo
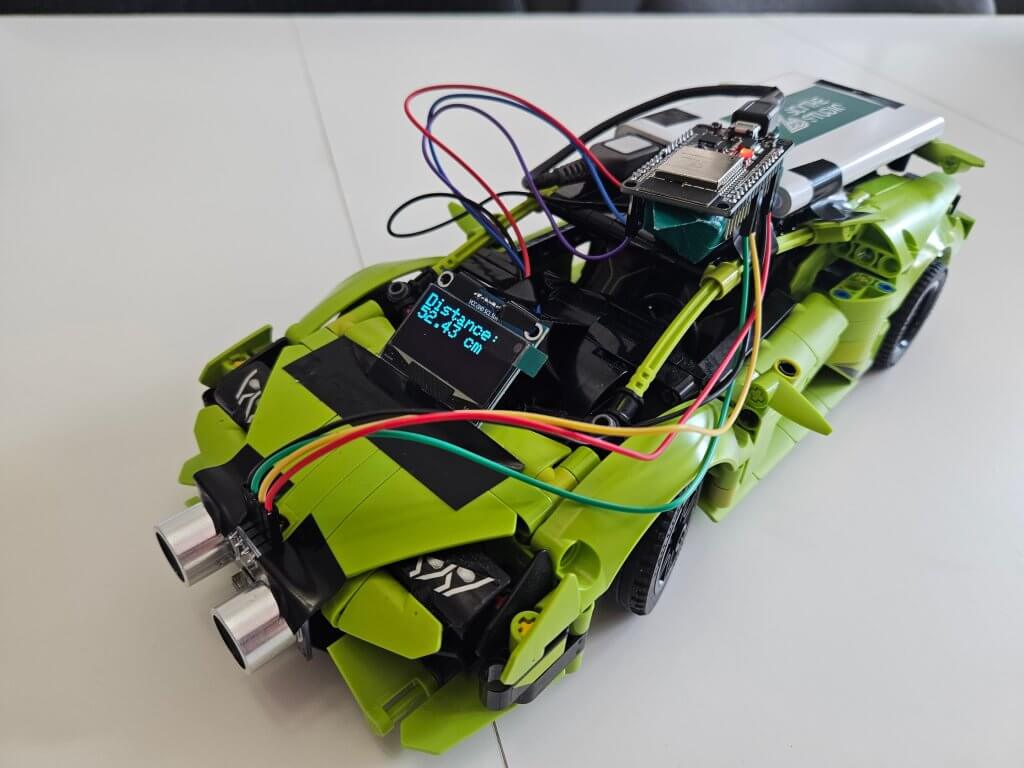
Of course, there are even more other applications than what we listed above. But it’s time for the practical part. For the purpose of this blog post, I decided to use some low-energy hardware I had on hand and decided that a very cool example of using Bluetooth LE would be to build a simple parking sensor for my new Lamborghini Huracan Evo Spyder (ofc green color – like the colors of Scythe Studio)!
 https://www.forbes.com/sites/kbrauer/2019/08/05/2020-lamborghini-huracan-evo-spyder-supercars-still-drive-this-supercar-brand/
I know I know, you’re probably surprised now that such a luxury car doesn’t have a parking sensor? Ha and here’s where I surprise you! Well, it doesn’t, because my car is a slightly poorer version… Specifically this…
 https://www.lego.com/pl-pl/product/lamborghini-huracan-tecnica-42161
The project involves building a parking sensor which I attach to the car and read out the data on a Qt application running on my laptop. All communication will be based on Bluetooth Low Energy using the Qt Bluetooth module.
In addition to the car, I used the following connected devices for this demo (wiring diagrams and such will be explained later):
-
- ESP32-DevKit board (ESP32-WROOM-32)
- HC-SR04-justPi ultrasonic sensor – detects distance
- OLED blue graphic display 1.3’’ 128x64px I2C v2 – blue characters – SH1106
- 8x connecting cables female-female
- Powerbank
- USB cable
Generic Attribute Profile (GATT)
Let us first discuss the more technical side of BLE technology. A key aspect of BLE’s technical design is the Generic Attribute Profile (GATT), which defines how data is organized and exchanged between devices. It is based on the concept of a client-server architecture, where the server holds data in the form of attributes and the client accesses this data.
In Bluetooth LE, the network topology is based on a star configuration:
-
-
Central (Client): Typically a smartphone or computer that initiates communication and requests data.
-
Peripheral (Server): Usually a sensor or wearable device that holds data and responds to client requests. It plays the central role.
This topology allows for efficient communication, where the central device can manage multiple peripherals simultaneously.
In our case parking sensor module is the server and the Qt application running on a laptop is the client.
GATT Transactions
GATT transactions in BLE are operations between the client (central) and the server (peripheral) to ensure reliable data exchange. These include:
-
-
Service and Characteristic Discovery: The client searches for available services and their characteristics on the server.
-
Read and Write Operations: The client reads data from a characteristic (e.g., current distance from a parking sensor) or writes data to it (e.g., configuring sensor settings).
-
Notifications and Indications: The server updates the client when a characteristic’s value changes (e.g., notifying the car’s system when the parking sensor detects a new obstacle distance). Notifications do not require acknowledgment, while indications do.
Key Elements of GATT
GATT transactions in BLE are structured around high-level, nested entities known as Profiles, Services, and Characteristics, as illustrated below.
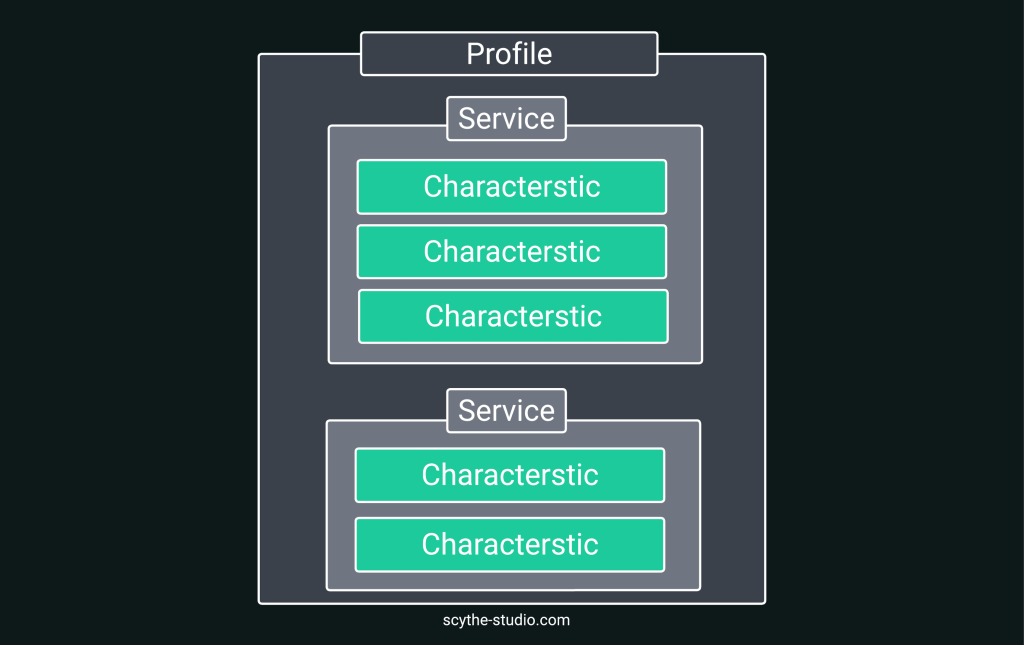 Gatt transactions specification
-
-
Profile – A profile defines how devices should use services and characteristics together for a specific purpose, ensuring they work well together. For example, a Parking Sensor Profile standardizes how parking sensors communicate with a car’s system.
-
Service – A service is a group of related features or data points on a device. Each service has a unique ID and can include multiple characteristics. For example, a Parking Sensor Service might have features for distance measurement and sensor status.
-
Characteristic – A characteristic is a specific piece of data, like the current distance reading from a parking sensor. Each characteristic has a unique ID and can be read, written, or used to send updates. Descriptors can provide extra details about the characteristic, like its unit of measurement.
Hardware with ESP32
Now that we know how to do what, let’s start by assembling the hardware. Below is an example of how to connect the display and sensor to the board.
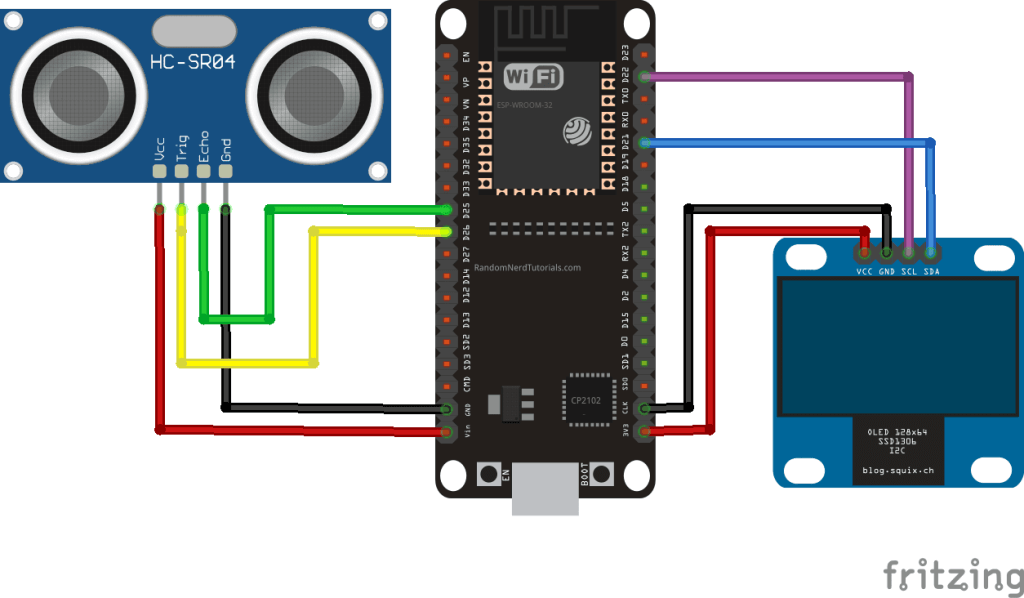
Let’s start with the distance sensor on the left. It works by emitting ultrasonic waves. This sensor has 4 pins which are connected as follows:
-
- VCC ↔ VIN (red cable) – power supply (5V)
- GND ↔ GND (black cable) – ground
- TRIG ↔ D26 (yellow cable) – trigger, responsible for activation of the sensor
- ECHO ↔ D25 (green cable) – echo, from this pin we read data
On the right, meanwhile, we have an OLED display with a resolution of 128×64. Here we also have 4 pins which we connect as follows
-
- VCC ↔ 3V3 (red cable) – power supply (3.3V)
- GND ↔ GND (black cable) – ground
- SCL ↔ D22 (purple cable) – CLK, clock
- Echo ↔ D21 (blue cable) – MOSI data transfer
After assembling everything and putting it on car, it look like this.
Software for Server
Now that we have gotten our hands dirty with the hardware, it is time to do some programming. Let’s start first with our server, the proximity sensor module. To do this, we connect our ESP32 to a laptop and write the code in the IDE of our choice (I used the Arduino IDE). I have broken the code into separate sections to make it easier to understand. First, let’s focus solely on the distance sensor itself.
constexpr int TRIG_PIN = 26;
constexpr int ECHO_PIN = 25;

float duration_us = 0;
float distance_cm = 0;

void setup() {
  pinMode(TRIG_PIN, OUTPUT);
  pinMode(ECHO_PIN, INPUT);
}

void loop() {
  digitalWrite(TRIG_PIN, HIGH);
  delayMicroseconds(10);
  digitalWrite(TRIG_PIN, LOW);

  duration_us = pulseIn(ECHO_PIN, HIGH);
  distance_cm = 0.017 * duration_us;
}
The operation of this code is very simple. First, we define the appropriate input and output pins. Then, in a program loop, we switch on the sensor for a short moment (10 microseconds), which causes the distance information to appear on the output pin. To obtain the value in cm, it is sufficient to multiply the obtained value (in microseconds) by 0.017 (this is derived from the formula for the distance depending on the speed of sound). Now lets take a look how to propagate this data over Bluetooth LE.
#include <BLEDevice.h>
#include <BLEServer.h>
#include <BLEUtils.h>

constexpr int TRIG_PIN = 26;
constexpr int ECHO_PIN = 25;

constexpr char *SERVICE_UUID = “a05fde7e-bacb-40b9-9856-efb85cdb8f66”;
constexpr char *CHARACTERISTIC_UUID = “eb99eb2b-048a-4fa7-a81f-4f62ca333f07”;

BLEServer *pServer = nullptr;
BLEService *pService = nullptr;
BLECharacteristic *pCharacteristic = nullptr;
float duration_us = 0;
float distance_cm = 0;

void setup() {
  pinMode(TRIG_PIN, OUTPUT);
  pinMode(ECHO_PIN, INPUT);

  BLEDevice::init("Scyhte_ESP32");
  pServer = BLEDevice::createServer();
  pService = pServer->createService(SERVICE_UUID);
  pCharacteristic = pService->createCharacteristic(
    CHARACTERISTIC_UUID,
    BLECharacteristic::PROPERTY_READ | BLECharacteristic::PROPERTY_NOTIFY
  );
  pService->start();

  BLEAdvertising *pAdvertising = BLEDevice::getAdvertising();
  pAdvertising->addServiceUUID(SERVICE_UUID);
  pAdvertising->setScanResponse(true);
  pAdvertising->setMinPreferred(0x06);
  pAdvertising->setMinPreferred(0x12);
  BLEDevice::startAdvertising();
}

void loop() {
  digitalWrite(TRIG_PIN, HIGH);
  delayMicroseconds(10);
  digitalWrite(TRIG_PIN, LOW);

  duration_us = pulseIn(ECHO_PIN, HIGH);
  distance_cm = 0.017 * duration_us;

  pCharacteristic->setValue(distance_cm);
  pCharacteristic->notify();
}
The first thing is to define the UUID for our service and characteristics. These values can be generated using a generator available on the internet. Then we create our BLEDevice named Scythe_ESP32. Next step is to create server object with service and characteristics in it (in our case only one characteristics with READ and NOTIFY flags). Next, we create a BLEAdvertising object for broadcasting our information. We set its UUID and additional parameters and launch our service.
Once all the required objects are set, our distance_cm value is set as the value of the characteristic and with each new retrieval of this value, we notify any devices connected to this characteristic
Software for Client – Connecting two Devices
We already have a working server, it was time for the client. To do this, I decided to write a simple application based on Qt with the Qt Bluetooth API along with a GUI written in QML.
The module and Qt Bluetooth API include classes for BLE devices discovery, service discovery, and data transfer. With Qt Bluetooth, you can manage Bluetooth connection, search for nearby low energy devices, and interact with Bluetooth services like serial ports or health devices. Qt Bluetooth supports both classic Bluetooth and Bluetooth Low Energy (BLE), making it versatile for various types of Bluetooth applications. One of the key advantages of Qt Bluetooth is its ability to integrate seamlessly with other Qt modules, ensuring a smooth development experience for building connected applications.
Of course, Qt Bluetooth API is supported on various platforms, so you can run your app on iOS or Android mobile phone, desktop or other platforms. You surely have a lot of options of connecting your main app with other Bluetooth devices.
The whole logic is present in one class – BLEController.cpp:
#include "BLEController.h"
#include <QTimer>

const QString TARGET_DEVICE_NAME = "Scyhte_ESP32";
const QString SERVICE_UUID = "a05fde7e-bacb-40b9-9856-efb85cdb8f66";
const QString CHARACTERISTIC_UUID = "eb99eb2b-048a-4fa7-a81f-4f62ca333f07";

BLEController::BLEController(QObject *parent)
    : QObject{parent}
{}

void BLEController::startBLE()
{
    discoveryAgent = new QBluetoothDeviceDiscoveryAgent(this);
    connect(discoveryAgent, &QBluetoothDeviceDiscoveryAgent::deviceDiscovered, this, &BLEController::deviceDiscovered);
    connect(discoveryAgent, &QBluetoothDeviceDiscoveryAgent::finished, this, &BLEController::scanFinished);

    discoveryAgent->start();
}

void BLEController::deviceDiscovered(const QBluetoothDeviceInfo &device)
{
    qDebug() << "Discovered device:" << device.name() << device.address().toString();

    if (device.name() == TARGET_DEVICE_NAME) {
        qDebug() << "Target device found.";
        discoveryAgent->stop();

        controller = QLowEnergyController::createCentral(device, this);
        connect(controller, &QLowEnergyController::connected, this, &BLEController::deviceConnected);
        connect(controller, &QLowEnergyController::disconnected, this, &BLEController::deviceDisconnected);
        connect(controller, &QLowEnergyController::serviceDiscovered, this, &BLEController::serviceDiscovered);
        connect(controller, &QLowEnergyController::discoveryFinished, this, &BLEController::serviceScanDone);

        controller->connectToDevice();
    }
}

void BLEController::scanFinished()
{
    qDebug() << "Device scan finished.";
    if (!controller) {
        qDebug() << "Target device not found.";
    }
}

void BLEController::deviceConnected()
{
    qDebug() << "Connected to device.";
    controller->discoverServices();
}

void BLEController::deviceDisconnected()
{
    qDebug() << "Disconnected from device.";
}

void BLEController::serviceDiscovered(const QBluetoothUuid &newService)
{
    qDebug() << "Service discovered:" << newService.toString();
}

void BLEController::serviceScanDone()
{
    qDebug() << "Service scan done.";
    service = controller->createServiceObject(QBluetoothUuid(SERVICE_UUID), this);
    if (!service) {
        qDebug() << "Service not found.";
        return;
    }

    qDebug() << "Creating service object: " << service->serviceUuid();

    connect(service, &QLowEnergyService::stateChanged, this, [this](const QLowEnergyService::ServiceState &newState){
        qDebug() << "State changed to: " << newState;
        if (newState == QLowEnergyService::RemoteServiceDiscovered) {
            characteristic = service->characteristic(QBluetoothUuid(CHARACTERISTIC_UUID));
            qDebug() << "Characteristic: " << characteristic.uuid();
            if (!characteristic.isValid()) {
                qDebug() << "Characteristic not found.";
                return;
            }
            service->readCharacteristic(characteristic);
        }
    });

    connect(service, &QLowEnergyService::characteristicRead, this, &BLEController::characteristicChanged);
    connect(service, &QLowEnergyService::characteristicChanged, this, &BLEController::characteristicChanged);
    service->discoverDetails();
}

void BLEController::characteristicChanged(const QLowEnergyCharacteristic &characteristic, const QByteArray &value)
{
    if (characteristic.uuid() == QBluetoothUuid(CHARACTERISTIC_UUID)) {
        qDebug() << "Characteristic value changed:" << value;
        m_distance = value.toFloat();
        emit distanceChanged();
        service->readCharacteristic(characteristic);
    }
}
Let’s start with the startBLE() function, which will be called when the corresponding button in the application is clicked. In it, we see the creation of a QBluetoothDeviceDiscoveryAgent object. This object is used to find all Bluetooth devices in our range. In case of finding a device, the deviceDiscovered() function is called.
In this function, we first check if the found device has the searched name (Scyhte_ESP32). If so, we create an object of the QLowEnergyController class, which allows access to Bluetooth Low Energy devices. We then link the appropriate signals to the function and connect to the device. The most important is the serviceScanDone() function.
In this function, we connect to the corresponding service (based on SERVICE_UUID). When the connection is successful, we connect to the corresponding characteristic (based on CHARACTERSITIC_UUID). Now, all you need to do is connect the appropriate slots to the signals from this characteristic and read its value.
The characteristicChanged() function is called each time the value of a characteristic changes (and therefore the distance has changed). In this case, we read this value and then propagate it to the UI.
So as u can see, Qt Bluetooth API offers everything that we need to create our application. If you are more interested, Qt Bluetooth module also supports Bluetooth mesh networking, which allows for creating large-scale device networks with robust communication capabilities.
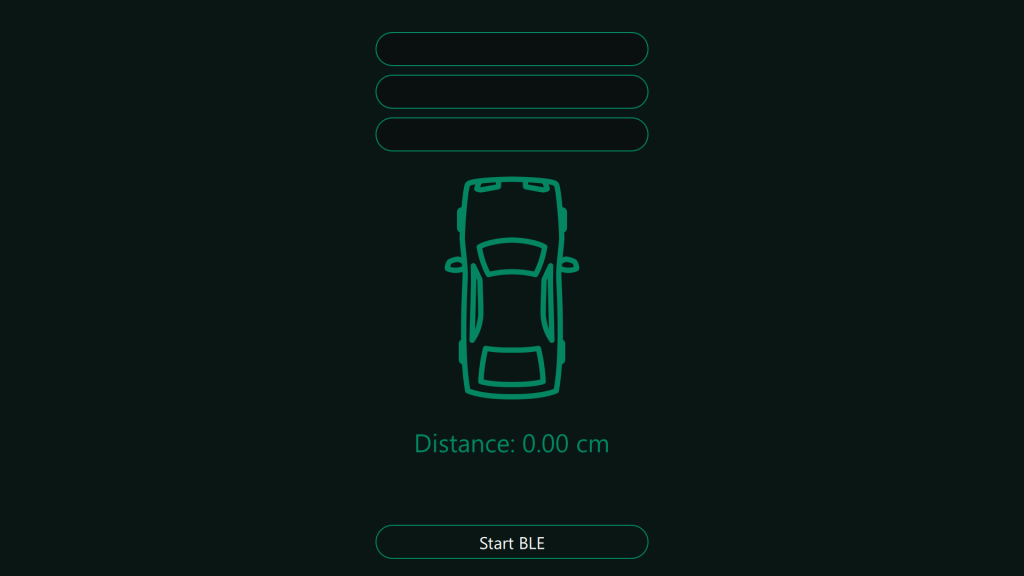
The GUI part is rather simple. We only need a button to start connecting to the device and 3 rectangle bars, that change color based on distance.
Results
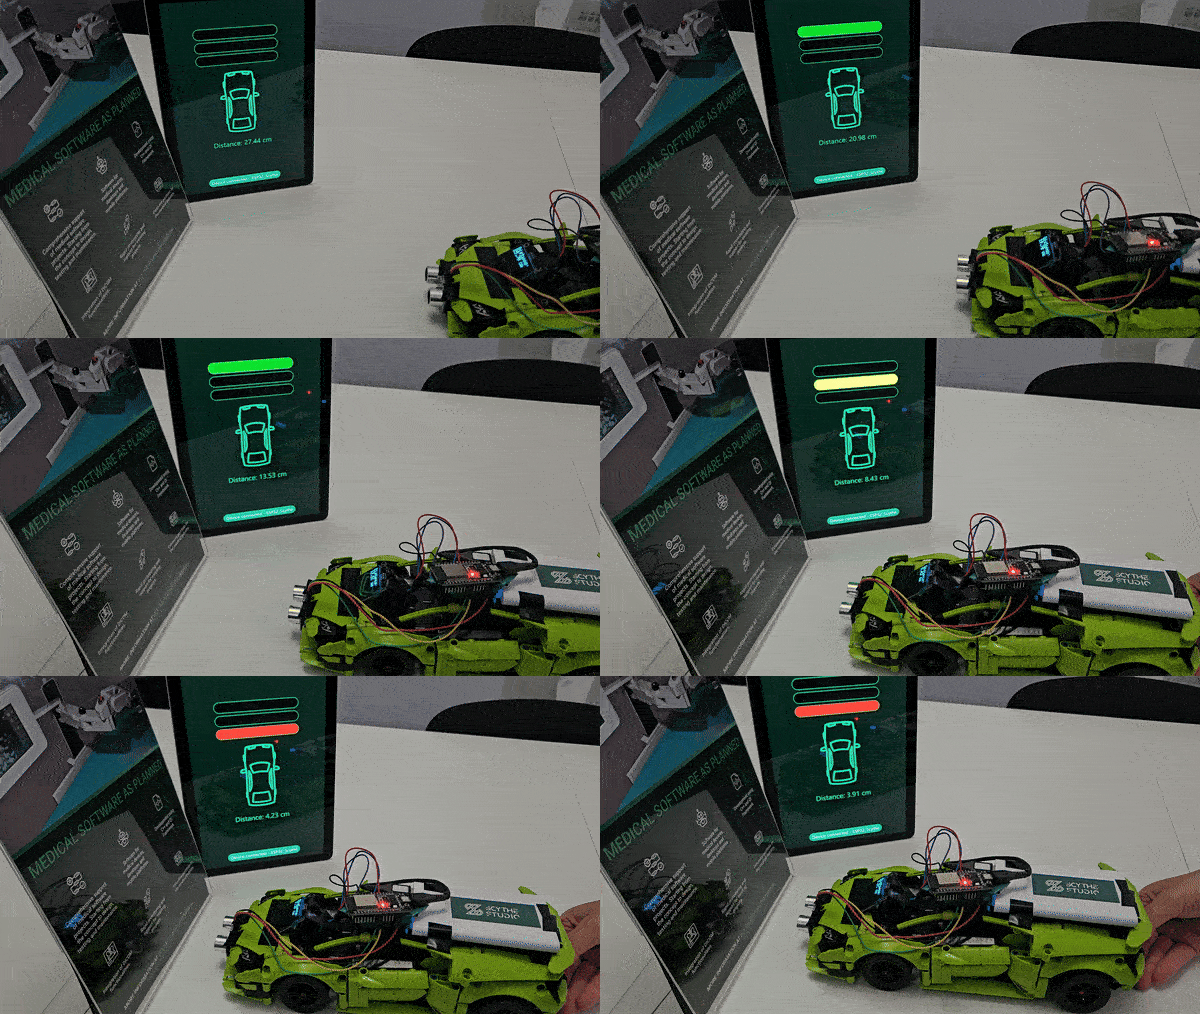
Here you can see the final result of our work 😉 I hope that by reading this article, you have gained new knowledge and experienced the wind in your hair by driving this sporty Lamborghini 😉 We encourage you to contact us to discover how we can address Bluetooth Low Energy technology and benefit from low energy consumption in your case.



 Gatt transactions specification


