How to use Qt WebAssembly – The Complete Guide with demo
Hey, welcome back to another blog post. Today we’re going to talk about the new Qt WebAssembly. This post will […]
Join us at Qt C++ Warsaw Meetup - 21.08.2025
Sign up for free!
Software development is demanding and often requires us to use languages or solutions that are not part of our main technology stack. There are many reasons for that. Sometimes we have to use solutions that are already implemented as it would take too much time to recreate them. There also might be a case, when we can’t use our main technology due to technical or financial reasons. In such circumstances, the possibility of using a different programming language from the one previously used can be beneficial. This allows our applications to be more flexible.
Qt and QML provide solutions to almost every problem. However there are some platform-specific edge cases when using native code can make things nice and easy – all thanks to Qt tools allowing you to use native code in your project. In this post, we will take a closer look at how to interface Android Java code with Qt. Let’s get down to business!
If you need help from experts with your project, then check out our Mobile development services.
For calling Android Java code inside Qt we will need a Qt Android Extras module. It includes classes to help you create applications for Android. Although this module can only be used if we have chosen the Android kit for our project.
Android Extras module contains QAndroidJniObject class, which provides APIs to call Java code from C++. This is exactly what we are looking for.
To use this module, we must add this declaration in .pro file:
QT += androidextras
Pointing where additional Java files are located is also needed. In our case, we will stick to the “android/src/package_name” format:
android {
    ANDROID_PACKAGE_SOURCE_DIR = $$PWD/android
    OTHER_FILES += android/src/ScytheStudio
}
Let’s create a simple example of Java class – a more complex code will be presented later in that post. Remember to put the .java file in ANDROID_PACKAGE_SOURCE_DIR :
package ScytheStudio;

public class SomeJavaClass {

    public static int counter = 0;
    public int id;

    public SomeJavaClass() {
        this.id = counter;
        System.out.println("Created SomeJavaClass object with id: " + this.id);
        counter++;
    }

    public String sayHello() {
        return "SomeJavaClass object number: " + id + " say hello :)";
    }

    public static double multiply(double a, double b) {
        return  a * b;
    }
}
Now we can write some Qt code. Begin with adding the import statement:
#include <QtAndroidExtras>
After that we need to check if the program is able to recognize our Java class. To do this we can use simple if statement:
//check if program can find our java class and use it
if(QAndroidJniObject::isClassAvailable("ScytheStudio/SomeJavaClass")) {
    .
    .
    .
else {
    qDebug() << "SOME JAVA CLASS UNAVAIABLE!";
}
At this moment we should have access to a custom Java class. To create its instance, call QAndroidJniObject constructor with the name of Java class as a parameter:
QAndroidJniObject someJavaObject = QAndroidJniObject("ScytheStudio/SomeJavaClass");
Console output should be as follows:
I System.out: Created SomeJavaClass object with id: 0
To use object method we call QAndroidJniObject::callObjectMethod. Although we determined the return type of function in Java code, Java types are not equal to C++ and Qt ones. We need to specify what type does this method return – that is why callObjectMethod is a template function. We use jstring because the sayHello method returns Java String object.
//calling object method
qDebug() << someJavaObject.callObjectMethod<jstring>("sayHello").toString();
You should see the following message in console:
D libQt_code_x86.so: “SomeJavaClass object number: 0 say hello :)”
Using static multiply function may seem a little more complicated. As before, we need to provide: return type, name of the class, and methods. Only difference to methods without any arguments is a method signature in callObjectMethod written as “(Argument1, Argument2, Argument3…)ReturnType“.
For our method, we use two integers as arguments and expect one integer result value. The signature of an integer is the “I” mark. In the documentation, you can find all JNI types and their signatures.
Our method signature will look like this: (II)I. In brackets, we have two “I” marks for our arguments and one “I” mark outside brackets for the return value. If we had a function that takes char and float as arguments and returns a string, its signature would look like this: “(CF)Ljava/lang/String”.
Finally, we pass the parameter values ( 2 and 3 ):
//calling static method
qDebug() << "2 * 3 equals: " << QAndroidJniObject::callStaticMethod<jint>("ScytheStudio/SomeJavaClass",                                                                                   "multiply",                                                                              "(II)I",
2, 3);
We can see that the method work as expected:
D libQt_code_x86.so: 2 * 3 equals: 6
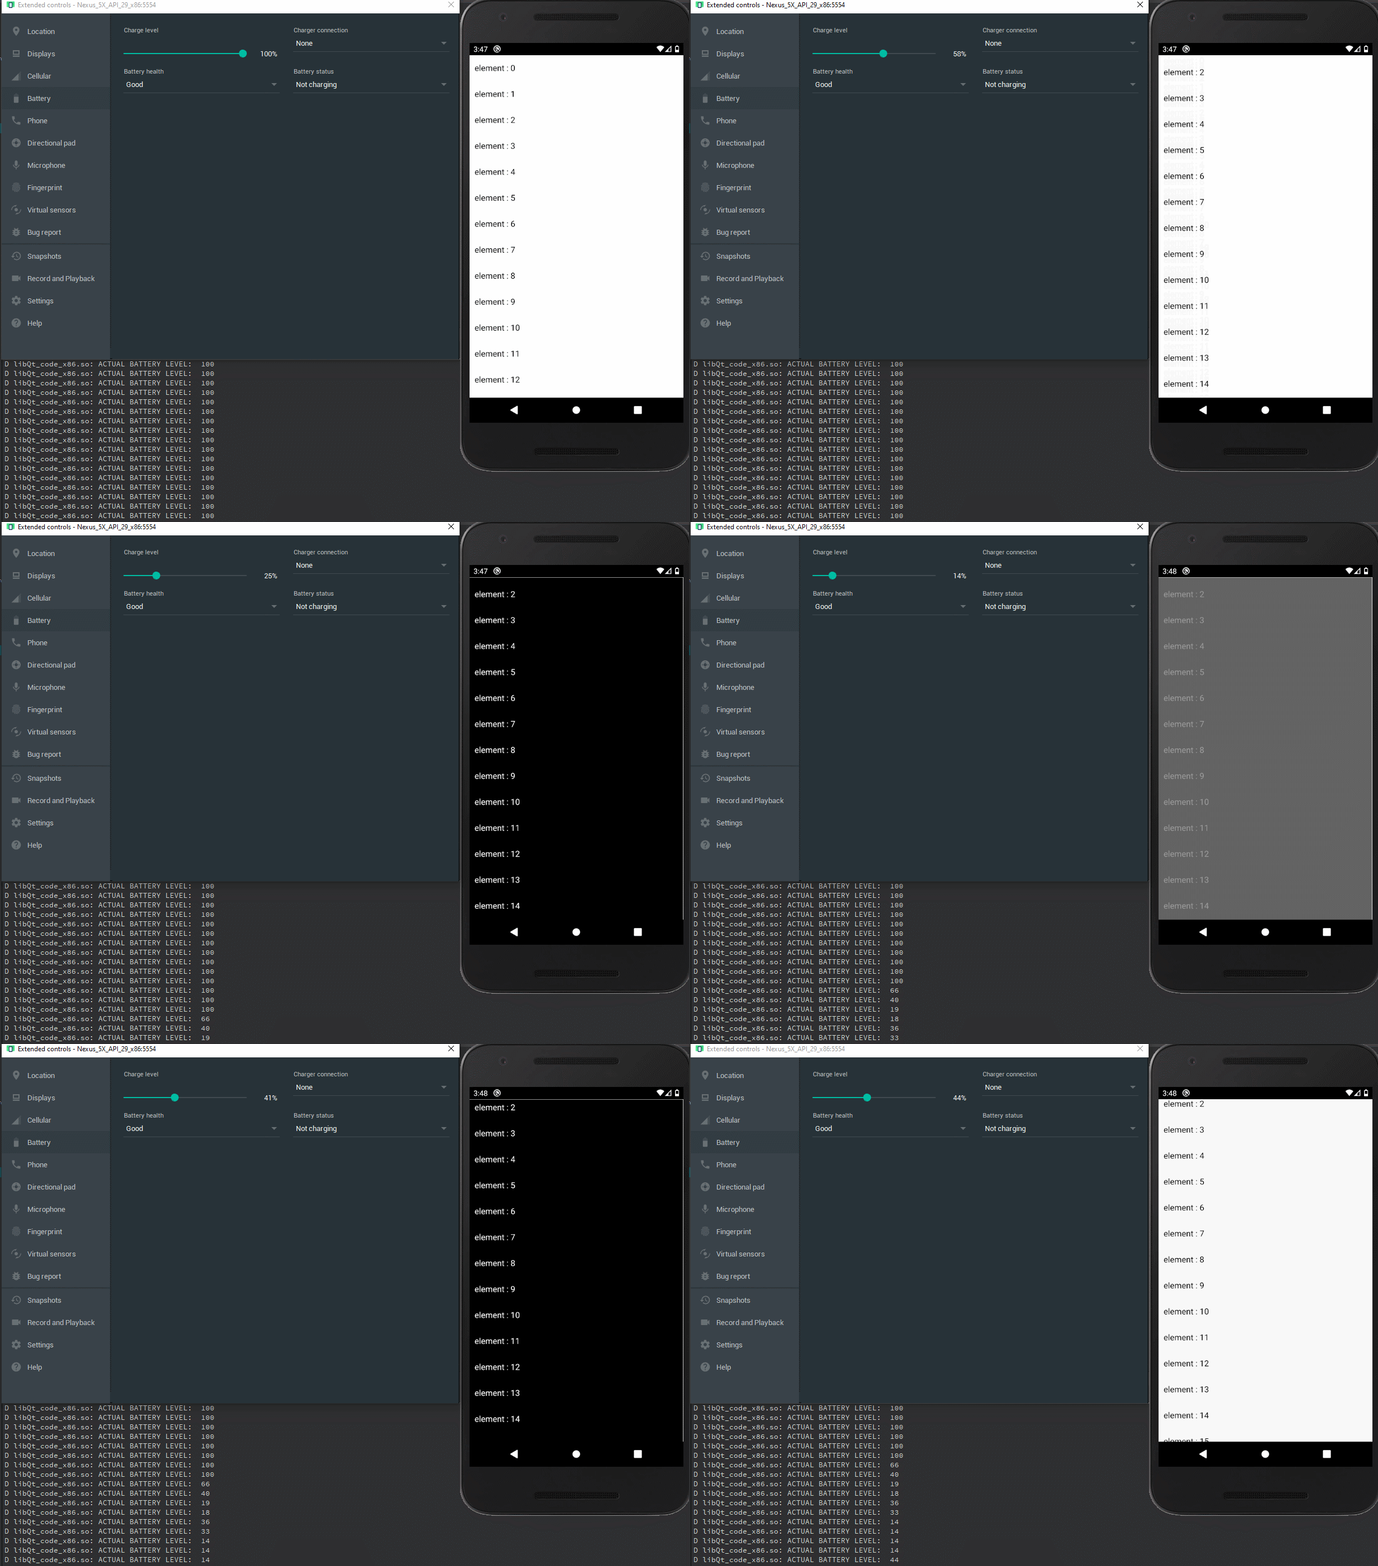
Imagine that there is an existing mobile application, which you maintain. The client wants a feature of simple battery saving mode. What we want to achieve is reduce power consumption when the battery level is low – for example by changing the app theme to dark.
Let’s start by creating CustomBatteryManager class. This class will check the current battery level every second and emit a proper signal when it changes.
CustomBatteryManager.h
#ifndef CUSTOMBATTERYMANAGER_H
#define CUSTOMBATTERYMANAGER_H

#include <QObject>
#include <QtAndroidExtras>
#include <QTimer>

class CustomBatteryManager : public QObject
{
    Q_OBJECT

public:
    explicit CustomBatteryManager(QObject *parent = nullptr);

    Q_PROPERTY(int batteryLevel READ batteryLevel WRITE setBatteryLevel NOTIFY batteryLevelChanged)

    int batteryLevel() const;
    void checkBatteryLevel();

public slots:
    void setBatteryLevel(int batteryLevel);

signals:

    void batteryLevelChanged(int batteryLevel);

private:
    int _batteryLevel = 0;
    QTimer *_timer;

};

#endif // CUSTOMBATTERYMANAGER_H
CustomBatteryManager.cpp
#include "CustomBatteryManager.h"

CustomBatteryManager::CustomBatteryManager(QObject *parent) : QObject(parent), _timer(new QTimer())
{
    connect(_timer, &QTimer::timeout, this, &CustomBatteryManager::checkBatteryLevel);
    _timer->setInterval(1000);
    _timer->start();
}

int CustomBatteryManager::batteryLevel() const
{
    return _batteryLevel;
}

void CustomBatteryManager::checkBatteryLevel()
{
    QAndroidJniObject activity = QtAndroid::androidActivity();
    QAndroidJniObject context = activity.callObjectMethod("getApplicationContext", "()Landroid/content/Context;");

    QAndroidJniObject batteryManager;
    QAndroidJniObject batteryManagerServiceName = QAndroidJniObject::fromString("batterymanager");
    jint batteryManagerCapacityConstant = QAndroidJniObject::getStaticField<jint>("android/os/BatteryManager", "BATTERY_PROPERTY_CAPACITY");

    batteryManager = context.callObjectMethod("getSystemService",
                                                  "(Ljava/lang/String;)Ljava/lang/Object;",
                                                   batteryManagerServiceName.object<jstring>());


    jint actualBatteryLevel = batteryManager.callMethod<jint>("getIntProperty", "(I)I", batteryManagerCapacityConstant);
    qDebug() << "ACTUAL BATTERY LEVEL: " << _batteryLevel;
    setBatteryLevel(actualBatteryLevel);
}

void CustomBatteryManager::setBatteryLevel(int batteryLevel)
{
    if (_batteryLevel == batteryLevel) {
       return;
   }

    _batteryLevel = batteryLevel;
    emit batteryLevelChanged(_batteryLevel);
}
Take a closer look at the constructor. To check the current battery level, we use a timer that calls the checkBatteryLevel function every second.
In checkBatteryLevel method, we are using the Android BatteryManager class to get the battery level.
First, we need to get the actual context of the application. To do that we use QtAndroid::androidActivity() which returns a handle to this application’s main Activity, and then call getApplicationContext on the activity object to get context.
After that, we want to create batteryManager object. To do that we will use the method getSystemService. This method takes the name of a particular service as an argument.
So we need to look at the Android Context documentation and find the name of the service we are interested in. For Battery manager it will be “batterymanager”. Let’s save this value in the auxiliary batteryManagerServiceName variable.
Now all you have to do is call the previously mentioned getSystemService method with the proper argument.
Next, we create jint batteryManagerCapacityConstatnt variable, because the actual battery level is stored as a static constant in the Battery manager class. Finally, we get battery value using getIntProperty method with batteryManagerCapacityConstatn as an argument and set our _batteryLevel value one the one received.
To use our CustomBatteryManager we can expose it to QML. If you don’t know how to do it, you can have a look at Qt documentation on this topic.
Now implement a simple UI to test the custom battery manager.
import QtQuick.Window 2.2
import QtQuick 2.15

Window {
  id: root
  visible: true

  ListView {
    id: listView

    anchors.fill: parent

    model: 50

    delegate: Rectangle {
      id: delegateItem

      width: listView.width
      height: 50

      color: customBatteryManager.batteryLevel > 30 ? "white" : "black"

      Behavior on color {
        PropertyAnimation {
          duration: 300
        }
      }
      Text {
        id: delegateText

        anchors {
          left: parent.left
          leftMargin: 10
          verticalCenter: parent.verticalCenter
        }

        text: qsTr("element") + " : " + index

        color: customBatteryManager.batteryLevel > 30 ? "black" : "white"
        horizontalAlignment: Text.AlignHCenter
        verticalAlignment: Text.AlignVCenter

        Behavior on color {
          PropertyAnimation {
            duration: 300
          }
        }
      }
    }
  }
}
To test it, I will use an android emulator and change the battery level through emulator options.

That’s the end of this tutorial. Now you know that you can easily use Android Java code in Qt. You have learned how to create objects, call up methods, and how to use them all on the example of our application. Thanks to the newly acquired knowledge you will be able to enrich your projects.
If you are still hungry for knowledge, check out other tutorials at Scythe-Studio blog and make sure to like our LinkedIn profile – this way you won’t miss any new post 🙂
Let's face it? It is a challenge to get top Qt QML developers on board. Help yourself and start the collaboration with Scythe Studio - real experts in Qt C++ framework.
Discover our capabilities
Hey, welcome back to another blog post. Today we’re going to talk about the new Qt WebAssembly. This post will […]

Users of embedded devices – from industrial controllers to consumer electronics – are often unaware of hidden vulnerabilities that threaten […]

Graphical user interfaces (GUIs) are becoming more and more important in embedded devices – from home appliances to medical equipment […]