Secure Boot and Firmware Protection in Embedded Systems
Users of embedded devices – from industrial controllers to consumer electronics – are often unaware of hidden vulnerabilities that threaten […]

Join us at Qt C++ Warsaw Meetup - 21.08.2025
Sign up for free!
Graphical user interfaces (GUIs) are becoming more and more important in embedded devices – from home appliances to medical equipment – to provide user friendly experience. But developing a rich GUI on resource constrained hardware is hard. LVGL (Light and Versatile Graphics Library) is a popular solution: it’s free, open-source graphics framework for microcontrollers and embedded systems.
As specialists in embedded systems development, we are always looking for the best solutions for rapid development. In this article we will take a closer look at LVGL, its architecture, features and benefits to help you choose the right tool for your embedded projects.
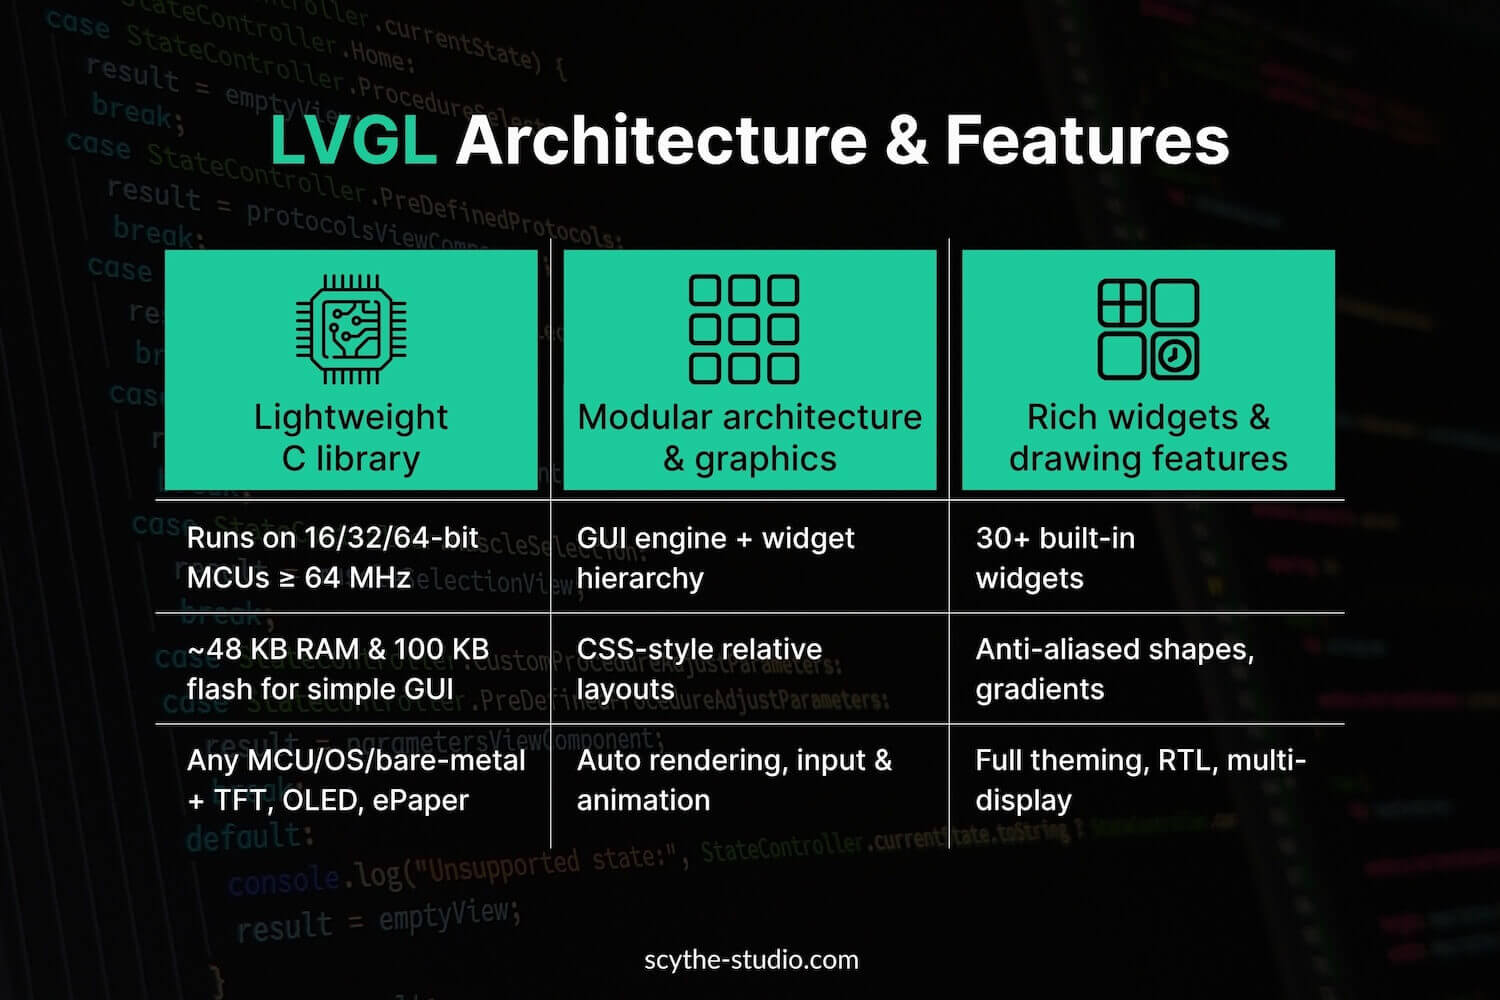
LVGL is a C library for embedded use. It has minimal hardware requirements, runs on 16-, 32- or 64-bit MCUs clocked ≥ 64 MHz and uses only tens of kilobytes of memory (about 48 KB RAM and 100 KB flash for a simple GUI). LVGL works with any MCU/MPU, any high quality display, any OS or even bare-metal environment. It supports common display types (TFT displays, OLED, ePaper, etc.) and color formats.
At the core LVGL provides a GUI rendering engine and an object hierarchy for UI elements (called “widgets”). Developers create UI objects (buttons, labels, sliders, etc.) and LVGL manages their rendering, input handling and animations. LVGL uses a relative layout system inspired by web/CSS paradigm – including flexbox and grid layouts – so widgets can position and size themselves automatically.
Despite its small footprint LVGL has a comprehensive set of GUI capabilities:
LVGL has several advantages for embedded GUI development, making it a popular choice for many teams:
No framework is perfect – it’s important to also consider LVGL’s limitations and the challenges of using it, to make an informed decision.
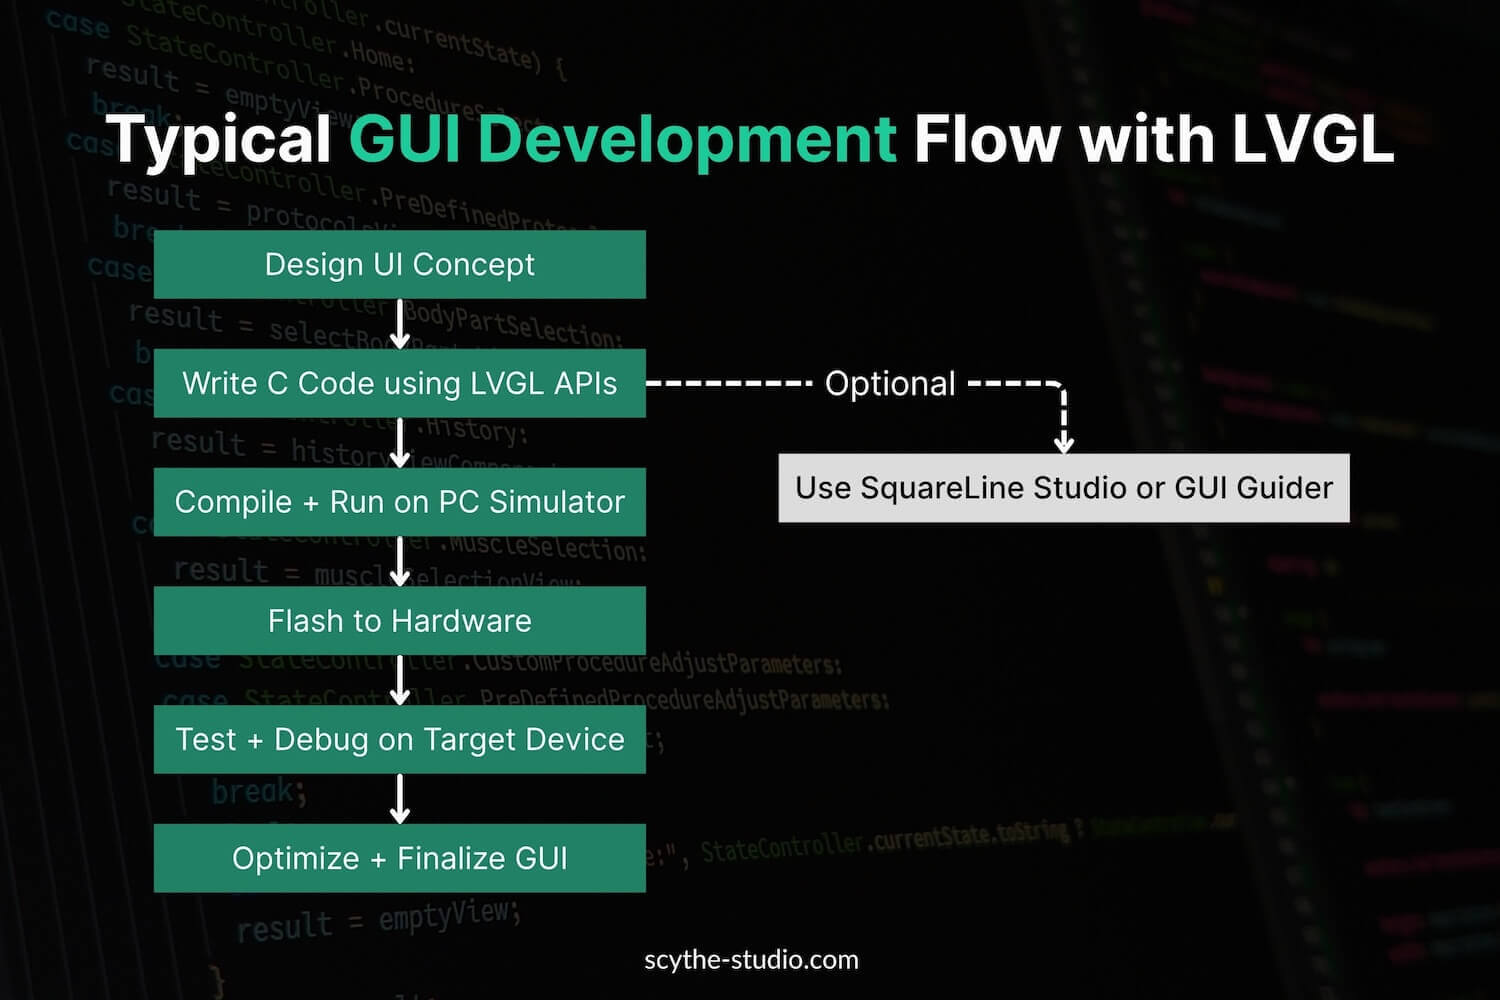
One of the main challenges often cited in working with LVGL is the lack of a mature, native GUI builder tool. While developers have traditionally had to rely on writing C code or using third-party editors like SquareLine Studio or GUI Guider, this limitation is gradually being addressed.
The official LVGL UI Editor is now in active development by the core team. Although still in its early stages (v0.3 as of July 2025), it already offers a structured approach to GUI building—with real-time preview, code export, Figma integration, drag-and-drop layout, advanced widgets, and data binding. The first production-ready release (v1.0) is planned for October 2025, and its arrival could significantly improve the workflow for design-focused teams.
Another consideration is the nature of support and warranties. LVGL, being an open-source project, doesn’t include bundled vendor support by default—unlike commercial solutions such as Qt for MCUs or Embedded Wizard, which offer support as part of their licensing. This can be a concern for teams requiring guaranteed SLAs or long-term maintenance.
However, for professional deployments, official commercial support is available directly from the LVGL maintainers via LVGL Services. This offering includes SLAs, direct engineering assistance, consulting, and access to a growing partner network. While not yet as mature or widely adopted as some proprietary ecosystems, it represents a meaningful step toward making LVGL viable for professional and large-scale deployments.
The niche ecosystem of LVGL means there are fewer third-party extensions and integrations than with bigger frameworks like Qt. While it has a lot of built-in features, teams might need to invest time in custom solutions for more specific needs, as the community and available resources are smaller.
Moreover, LVGL is primarily a GUI toolkit, so other essential application functions like networking, file systems or threading utilities must be handled by separate libraries or the OS. This is typical for embedded systems, but teams should be aware that LVGL only focuses on the GUI aspect.
In terms of performance tuning, while LVGL is very efficient, achieving optimal performance on constrained hardware might require some low-level adjustments. For example, developers might need to profile rendering and fine-tune memory usage to avoid issues like flicker or excessive CPU usage, especially when using advanced visual effects or even monitors in the interface. This is an area where commercial solutions might have an advantage, with built-in optimizations for the target hardware.
Finally, manual memory management can be a challenge for teams used to higher-level frameworks with garbage collection. LVGL requires developers to manage memory manually, which can be an adjustment for those coming from more abstracted environments. Deleting UI objects and screens properly is critical for memory management.

LVGL is not the only player in embedded GUIs. Other popular frameworks are TouchGFX, Qt for MCUs, and Embedded Wizard. Each has its own approach and might be better or worse fit for the project. Below is a brief comparison of these frameworks vs LVGL:
| Feature | LVGL | TouchGFX | Qt for MCUs | Embedded Wizard |
| License | Free (open-source) | Proprietary (free for STM32) | Commercial | Commercial |
| Open Source | Yes | No | No | No |
| Target Audience | General embedded systems | STM32 users | General embedded systems (Qt users) | General embedded systems |
| Ease of Use | Moderate (manual setup with XML) | High (WYSIWYG GUI editor) | High (QML-based UI design) | High (WYSIWYG GUI editor) |
| Customizability | High (full control over code) | Moderate (limited customizability) | Low (less flexibility compared to LVGL) | Moderate (limited control over generated code) |
| Hardware Support | Wide range of MCUs | STM32 microcontrollers | Selected MCU families (STM32, NXP, Renesas) | Wide range of MCU families |
| Performance | High (lightweight, optimized) | High (optimized for STM32 hardware) | Moderate (higher resource usage) | High (optimized for low footprint) |
| Development Tools | GUI editor in early stage | GUI designer (TouchGFX Designer) | Qt Design Studio, QML, Qt Quick Ultralite | WYSIWYG editor, Chora language |
| Cost | Free | Free with STM32, commercial use requires ST license | Commercial license required | Commercial license required |
In summary, here’s an objective snapshot of these frameworks:
The choice depends on your project constraints – e.g. which microcontroller you use, your team’s skill set, UI complexity and budget for tools. Many vendors (like NXP, ST, Renesas) actually support multiple of these frameworks in their SDKs, because each has its niche. The good news is that LVGL often is the flexible choice if you want to stay vendor-neutral and cost-efficient, as long as you’re willing to code the GUI yourself.
LVGL’s versatility makes it suitable for a wide range of industries. In medical devices, it powers interfaces in devices like blood glucose monitors, heart rate monitors, and ventilators, providing crisp graphics and real-time data display on resource-constrained systems. Its open-source nature is beneficial in regulated industries like healthcare, avoiding licensing issues.
In industrial automation, LVGL is used in HMIs for factory control panels, PLC screens, and CNC machines. Its low resource usage and deterministic behavior make it ideal for real-time, high-reliability applications. LVGL’s ability to customize UIs is especially valued in the industrial sector, where branded, unique interfaces are needed.
For consumer electronics and wearables, LVGL powers smartwatches, fitness trackers, and home appliances. Its skinnable UI and low overhead make it a great choice for creating modern interfaces with smooth animations, even on cost-effective hardware.
In the automotive sector, LVGL supports automotive displays, infotainment systems, and digital instrument clusters, thanks to its fast boot time and low overhead. It’s used in embedded displays in vehicles, providing reliable graphics for navigation, climate control, and more.
Overall, LVGL is a flexible solution for embedded GUI tasks across various industries, excelling in performance, reliability, and customizability for 2D-based applications.
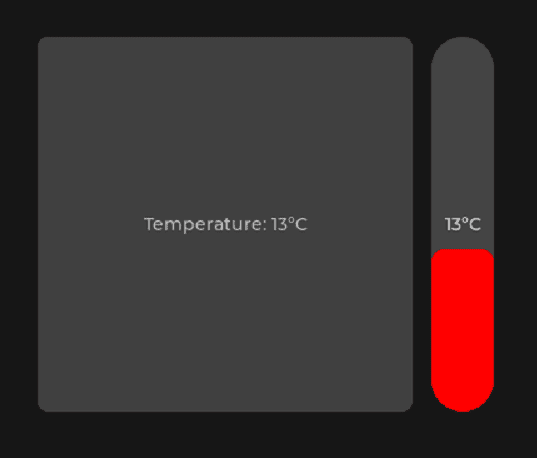
In this example, we’ll create a basic smart home control panel using LVGL. The interface will feature a temperature display button and a slider. The slider will allow the user to adjust the house temperature, and the button will dynamically reflect the current temperature setting.
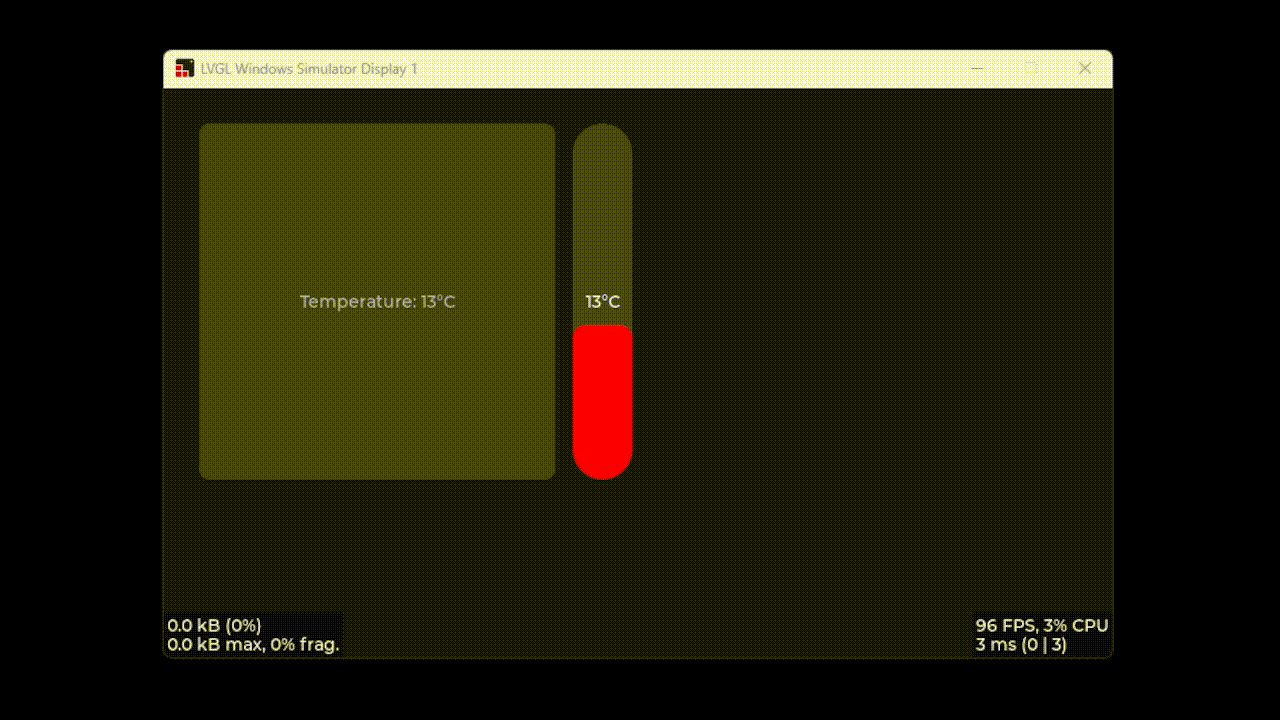
Since LVGL is primarily designed for embedded systems, I ran this example using the LVGL Windows simulator. This allows the LVGL application to run directly on my Windows machine, making it easy to develop, test, and record the interface without needing actual embedded hardware.
This setup is ideal for prototyping and creating demos like the one.
We begin by customizing the screen’s appearance and preparing the layout that will hold our smart home controls.
1. Clear default styles and set a dark background
We remove all existing styles from the active screen and apply a dark gray background with full opacity:
lv_obj_remove_style_all(lv_scr_act());
lv_obj_set_style_bg_color(lv_scr_act(), lv_color_hex(0x161616), 0);
lv_obj_set_style_bg_opa(lv_scr_act(), LV_OPA_COVER, 0);
2. Create a horizontal container (main row)
Next, we create a full-screen container to hold the button and slider. This container uses LVGL’s flex layout with horizontal flow and spacing between elements:
lv_obj_t *main_row = lv_obj_create(lv_scr_act());
lv_obj_remove_style_all(main_row);
lv_obj_set_size(main_row, LV_PCT(100), LV_PCT(100));
lv_obj_set_flex_flow(main_row, LV_FLEX_FLOW_ROW);
lv_obj_set_style_pad_column(main_row, 15, 0); // 15 pixels spacing between children
lv_obj_set_style_bg_opa(main_row, LV_OPA_TRANSP, 0);

// Add margins:
lv_obj_set_style_pad_top(main_row, 30, 0);   // 30 pixels top margin
lv_obj_set_style_pad_left(main_row, 30, 0);  // 30 pixels left margin

 lv_obj_align(main_row, LV_ALIGN_CENTER, 0, 0);
This main_row will serve as the base layout, arranging our temperature button and slider side by side.
Now we add a button to the left side of our smart home panel. This button will display the current temperature and respond to click events.
1. Create the button and apply custom styles
We add a child object to main_row, remove its default style, and size it to 300×300 pixels. The background is styled with a dark gray color (#404040), full opacity, and slightly rounded corners:
button = lv_obj_create(main_row);
lv_obj_remove_style_all(button);
lv_obj_set_size(button, 300, 300);
lv_obj_set_style_bg_color(button, lv_color_hex(0x404040), 0);
lv_obj_set_style_bg_opa(button, LV_OPA_COVER, 0);
lv_obj_set_style_radius(button, 8, 0);
lv_obj_align(button, LV_ALIGN_CENTER, 0, 0);
2. Add click interaction
We register a callback function (more on that later) to handle click events on the button:
lv_obj_add_event_cb(button, button_event_cb, LV_EVENT_CLICKED, NULL);
3. Add and style the temperature label
Inside the button, we place a label to display the current temperature. It’s centered and styled with a light gray color (#BBBBBB):
g_temp_label = lv_label_create(button);
lv_label_set_text_fmt(g_temp_label, "Temperature: %d°C", temperature);
lv_obj_set_style_text_color(g_temp_label, lv_color_hex(0xBBBBBB), 0);
 lv_obj_center(g_temp_label);
This button serves as a dynamic temperature display and interactive element within the panel.
Next, we add a vertical slider to the right side of the row layout. This slider allows the user to adjust the temperature, and a label on the slider will show its current value in real-time.
1. Create the slider and define its size and range
The slider is added as a child to main_row, stripped of default styles, and sized to 50×300 pixels. It’s centered vertically and configured to allow values between 0°C and 30°C, initially set to 13°C:
lv_obj_t *slider = lv_slider_create(main_row);
lv_obj_remove_style_all(slider);
lv_obj_set_size(slider, 50, 300);
lv_obj_align(slider, LV_ALIGN_CENTER, 0, 0);
lv_slider_set_range(slider, 0, 30);
lv_slider_set_value(slider, 13, LV_ANIM_OFF);
2. Style the main slider track
The base (main part) of the slider is styled with a dark gray color (#444444), full opacity, and a large corner radius for a rounded look:
lv_obj_set_style_bg_color(slider, lv_color_hex(0x444444), LV_PART_MAIN);
lv_obj_set_style_bg_opa(slider, LV_OPA_COVER, LV_PART_MAIN);
lv_obj_set_style_radius(slider, 50, LV_PART_MAIN);
3. Style the slider’s indicator (filled part)
The indicator part shows how much of the slider is filled. It’s styled in red (#FF0000) with full opacity and a smaller radius for contrast:
lv_obj_set_style_bg_color(slider, lv_color_hex(0xFF0000), LV_PART_INDICATOR);
lv_obj_set_style_bg_opa(slider, LV_OPA_COVER, LV_PART_INDICATOR);
lv_obj_set_style_radius(slider, 10, LV_PART_INDICATOR);
4. Add a dynamic value label
A label is created inside the slider to display the current value (e.g., “13°C”). It is centered and styled in white text for visibility:
    lv_obj_t *slider_val_label = lv_label_create(slider);
    lv_label_set_text_fmt(slider_val_label, "%d°C", 13);
    lv_obj_set_style_text_color(slider_val_label, lv_color_white(), 0);
    lv_obj_align(slider_val_label, LV_ALIGN_CENTER, 0, 0);
We also attach the label to the slider using lv_obj_set_user_data() so that it can be updated dynamically in the event callback.
5. Handle value changes
Finally, we register an event callback for when the slider value changes. This callback can update the temperature and label text:
lv_obj_set_user_data(slider, slider_val_label);
lv_obj_add_event_cb(slider, slider_event_cb, LV_EVENT_VALUE_CHANGED, NULL);
The button_event_cb function handles click events for the temperature button. When the button is clicked, it toggles an internal selected flag to keep track of whether the button is currently active or not.
Visually, this selection is represented by a red border around the button. If the button is selected, a 4-pixel red border is added to highlight it. If it’s clicked again and deselected, the border is removed, and the button returns to its original gray appearance.
static void button_event_cb(lv_event_t *e)
{
    selected = !selected;

    if (selected)
    {
        lv_obj_set_style_border_width(button, 4, 0);
        lv_obj_set_style_border_color(button, lv_color_hex(0xFF0000), 0);
        lv_obj_set_style_border_opa(button, LV_OPA_COVER, 0);
    }
    else
    {
        lv_obj_set_style_border_width(button, 0, 0);
        lv_obj_set_style_bg_color(button, lv_color_hex(0x404040), 0);
        lv_obj_set_style_bg_opa(button, LV_OPA_COVER, 0);
    }
}
The slider_event_cb function handles value change events from the temperature slider. Whenever the user moves the slider, this callback is triggered.
Inside the callback, we first check that the event is of type LV_EVENT_VALUE_CHANGED — meaning the slider’s value was adjusted. We then retrieve the new value from the slider and update two labels:
This allows the slider to provide immediate feedback to the user both locally and in the broader interface, creating a responsive and intuitive temperature control experience.
static void slider_event_cb(lv_event_t *e)
{
    if (lv_event_get_code(e) == LV_EVENT_VALUE_CHANGED)
    {
        lv_obj_t *slider = lv_event_get_target(e);
        lv_obj_t *slider_val_label = (lv_obj_t *)lv_obj_get_user_data(slider);
        int val = lv_slider_get_value(slider);

        if (slider_val_label)
        {
            lv_label_set_text_fmt(slider_val_label, "%d°C", val);
        }

        if (g_temp_label)
        {
            lv_label_set_text_fmt(g_temp_label, "Temperature: %d°C", val);
        }
    }
}
Below is the complete code for our simple smart home temperature panel using LVGL. It includes the layout setup, interactive button and slider components, and their corresponding event callbacks for dynamic UI updates.
/**
 * @file lv_demo_scythe.c
 *
 */

/*********************
 *      INCLUDES
 *********************/
#include "lv_demo_scythe.h"
#include "../../lvgl_private.h"


/* Forward declares */
static void button_event_cb(lv_event_t *e);
static void slider_event_cb(lv_event_t *e);

/* Global pointers */
bool selected = false;
int temperature = 13; // Initial temperature value
static lv_obj_t *button = NULL;
static lv_obj_t *g_temp_label = NULL;

/***********************************************************
 * MAIN DEMO FUNCTION
 ***********************************************************/

void lv_demo_scythe(void)
{
    /* 1) background */
    lv_obj_remove_style_all(lv_scr_act());
    lv_obj_set_style_bg_color(lv_scr_act(), lv_color_hex(0x161616), 0);
    lv_obj_set_style_bg_opa(lv_scr_act(), LV_OPA_COVER, 0);

    // Create a row container for button and side panel
    lv_obj_t *main_row = lv_obj_create(lv_scr_act());
    lv_obj_remove_style_all(main_row);
    lv_obj_set_size(main_row, LV_PCT(100), LV_PCT(100));
    lv_obj_set_flex_flow(main_row, LV_FLEX_FLOW_ROW);
    lv_obj_set_style_pad_column(main_row, 15, 0); // 15 pixels spacing between children
    lv_obj_set_style_bg_opa(main_row, LV_OPA_TRANSP, 0);

    // Add margins:
    lv_obj_set_style_pad_top(main_row, 30, 0);   // 30 pixels top margin
    lv_obj_set_style_pad_left(main_row, 30, 0);  // 30 pixels left margin

    lv_obj_align(main_row, LV_ALIGN_CENTER, 0, 0);

    // Button (left)
    button = lv_obj_create(main_row);
    lv_obj_remove_style_all(button);
    lv_obj_set_size(button, 300, 300);
    lv_obj_set_style_bg_color(button, lv_color_hex(0x404040), 0);
    lv_obj_set_style_bg_opa(button, LV_OPA_COVER, 0);
    lv_obj_set_style_radius(button, 8, 0);
    lv_obj_align(button, LV_ALIGN_CENTER, 0, 0);
    lv_obj_add_event_cb(button, button_event_cb, LV_EVENT_CLICKED, NULL);

    g_temp_label = lv_label_create(button);
    lv_label_set_text_fmt(g_temp_label, "Temperature: %d°C", temperature);
    lv_obj_set_style_text_color(g_temp_label, lv_color_hex(0xBBBBBB), 0);
    lv_obj_center(g_temp_label);

    // Slider (right, directly in the row)
    lv_obj_t *slider = lv_slider_create(main_row);
    lv_obj_remove_style_all(slider);
    lv_obj_set_size(slider, 50, 300);
    lv_obj_align(slider, LV_ALIGN_CENTER, 0, 0);
    lv_slider_set_range(slider, 0, 30);
    lv_slider_set_value(slider, 13, LV_ANIM_OFF);

    lv_obj_set_style_bg_color(slider, lv_color_hex(0x444444), LV_PART_MAIN);
    lv_obj_set_style_bg_opa(slider, LV_OPA_COVER, LV_PART_MAIN);
    lv_obj_set_style_radius(slider, 50, LV_PART_MAIN);

    lv_obj_set_style_bg_color(slider, lv_color_hex(0xFF0000), LV_PART_INDICATOR);
    lv_obj_set_style_bg_opa(slider, LV_OPA_COVER, LV_PART_INDICATOR);
    lv_obj_set_style_radius(slider, 10, LV_PART_INDICATOR);

    lv_obj_t *slider_val_label = lv_label_create(slider);
    lv_label_set_text_fmt(slider_val_label, "%d°C", 13);
    lv_obj_set_style_text_color(slider_val_label, lv_color_white(), 0);
    lv_obj_align(slider_val_label, LV_ALIGN_CENTER, 0, 0);
    lv_obj_set_user_data(slider, slider_val_label);
    lv_obj_add_event_cb(slider, slider_event_cb, LV_EVENT_VALUE_CHANGED, NULL);
}

/***********************************************************
 * CALLBACKS
 ***********************************************************/
static void button_event_cb(lv_event_t *e)
{
    selected = !selected;

    if (selected)
    {
        lv_obj_set_style_border_width(button, 4, 0);
        lv_obj_set_style_border_color(button, lv_color_hex(0xFF0000), 0);
        lv_obj_set_style_border_opa(button, LV_OPA_COVER, 0);
    }
    else
    {
        lv_obj_set_style_border_width(button, 0, 0);
        lv_obj_set_style_bg_color(button, lv_color_hex(0x404040), 0);
        lv_obj_set_style_bg_opa(button, LV_OPA_COVER, 0);
    }
}

static void slider_event_cb(lv_event_t *e)
{
    if (lv_event_get_code(e) == LV_EVENT_VALUE_CHANGED)
    {
        lv_obj_t *slider = lv_event_get_target(e);
        lv_obj_t *slider_val_label = (lv_obj_t *)lv_obj_get_user_data(slider);
        int val = lv_slider_get_value(slider);

        if (slider_val_label)
        {
            lv_label_set_text_fmt(slider_val_label, "%d°C", val);
        }

        if (g_temp_label)
        {
            lv_label_set_text_fmt(g_temp_label, "Temperature: %d°C", val);
        }
    }
}
This simple smart home panel demonstrates how quickly you can build clean, responsive interfaces using LVGL. With just a few lines of code, we created a modern-looking layout featuring real-time interaction between UI elements — a temperature button that reacts to user input and a slider that updates display values instantly.
This example is a great starting point for more advanced smart home interfaces, dashboards, or embedded applications. Whether you’re building controls for HVAC, lighting, or appliances, LVGL gives you the tools to make it intuitive and visually appealing.
In conclusion, LVGL is a powerful tool to get polished GUIs on small microcontrollers. The world of embedded GUI development is big and getting bigger – and whatever you choose, LVGL or another framework, the goal remains the same: to create an interface that delights users and meets the technical constraints of your device.
When choosing a GUI framework, consider not just the library itself but the bigger picture: your product requirements, your team’s expertise and long-term maintainability. Some companies opt to partner with GUI development companies to help with this decision. Working with developers who have deep experience in frameworks like Qt and LVGL can give you an objective view on what fits your project’s needs. Such partners can accelerate development and ensure the chosen technology is used optimally – whether it’s LVGL or another solution – without a hard bias towards any single tool. In Scythe Studio we have a GUI-focused development team and we found that a careful upfront evaluation saves a lot of time later. By leveraging the right expertise, you can make the right choice and implement the GUI framework that will deliver a great user experience for your embedded product.
If you’re interested in exploring LVGL further, here are some useful resources: the official LVGL documentation and tutorials (available on docs.lvgl.io) provide in-depth guides on everything from basic widget creation to advanced customizations. The LVGL GitHub repo contains a wealth of LVGL examples and a simulator project to try out. There’s also an active forum (forum.lvgl.io) where you can ask questions and see how others solved similar problems.


Let's face it? It is a challenge to get top Qt QML developers on board. Help yourself and start the collaboration with Scythe Studio - real experts in Qt C++ framework.
Discover our capabilitiesUsers of embedded devices – from industrial controllers to consumer electronics – are often unaware of hidden vulnerabilities that threaten […]
Technical managers in the embedded space often face a classic challenge: integrating industrial communication protocols into modern applications. One such […]


Why is visualization so important in finance? First and foremost is clarity. Good visuals cut through complexity, making it easier […]
