Secure Boot and Firmware Protection in Embedded Systems
Users of embedded devices – from industrial controllers to consumer electronics – are often unaware of hidden vulnerabilities that threaten […]

On our blog, we have repeatedly covered various ‘branches’ of Qt-a such as 3D, Android, DBus, etc (the latter topic has been covered by my colleague Mateusz, so I encourage you to take a look at his post about using D-Bus with Qt 6 🤗).
In the meantime, get in touch with us if you need help with Qt development services!
So it’s time to explore another area which is Qt Embedded programming with Qt for MCU. I will try to discuss what Qt for MCUs is and show a sample application coded using the Qt framework – a complete graphics framework.
So let’s start this interesting journey!
Let’s start by discussing what the abbreviation M-C-U even means. It is an abbreviation for “Microcontroller unit“. People unfamiliar with electronics may find this term difficult, so I will try to explain it in simple terms.
Microcontrollers are small, integrated electronic circuits that contain a microprocessor, program memory, data memory, various input/output (I/O) interfaces, and often a real-time clock (RTC) – all on a single chip.
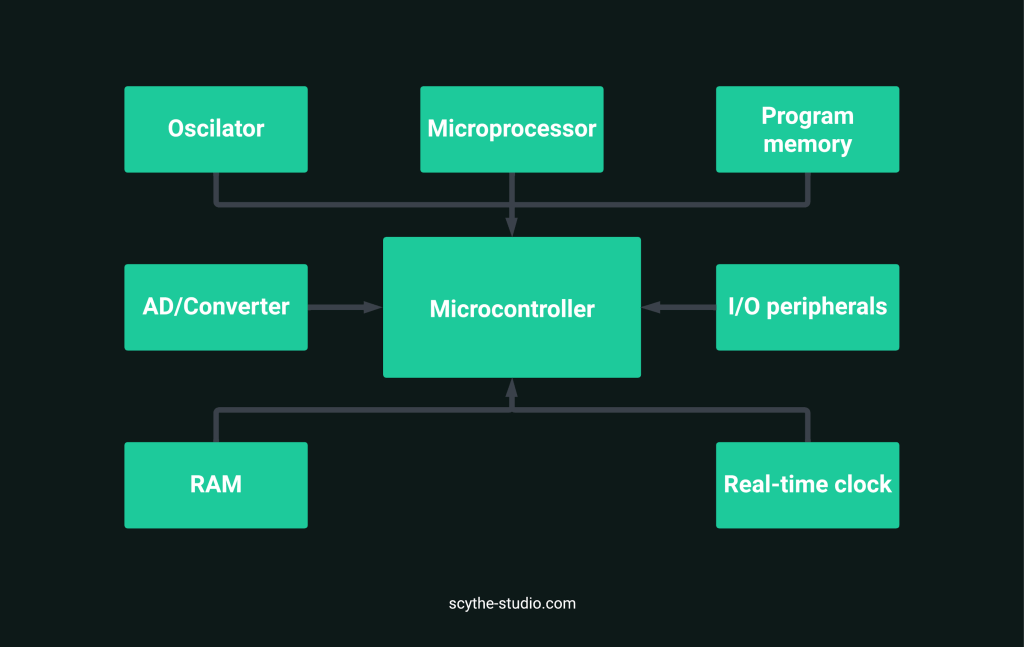 Typical architecture of MCU
Microcontrollers are designed to control one specific task or set of tasks in a variety of electronic devices. They are widely used in embedded platforms, including smartphones, automotive electronics, home appliances, medical devices, industrial controllers, and many others.
When talking about microcontrollers, at the start it is very easy to confuse them with microcomputers (otherwise known as single-board computers) and sometimes even microprocessors. Our CTO would slap me on the head if I didn’t explain it, so let’s start the explanation 😅.
A microprocessor is a central processing unit (CPU) located on a single integrated circuit (chip). Its main task is to perform arithmetic-logic operations and control the flow of data in a computer system. It usually consists of an arithmetic logic unit (ALU), a control unit, registers, and a cache. The microprocessor is a fairly complex component, but it does not contain many additional functions beyond basic computing operations.
A microcontroller is a complete computer system, embedded on a single chip. In addition to the microprocessor, it contains memory (RAM, ROM/Flash), input/output interfaces (GPIO), counters, timers, and often communication modules. The microcontroller includes various functional blocks that enable it to perform a specific task without the need for external components. Microcontrollers are optimized for one specific task, which means they are more self-sufficient compared to microprocessors.
A microcomputer is a complete computer system, integrated on a single motherboard or in a single enclosure (hence the name: single-board computer). It includes a microprocessor, operating memory, storage, input/output interfaces, and other computer-specific components. Microcomputers are more complex than microcontrollers and often have the full capabilities of personal computers, but on a smaller scale. Unlike microcontrollers, microcomputers are more versatile and can be used for a wider range of applications.
Speaking of use cases for microcontrollers, we can think of a few examples where we use them. These are often things that surround us such as:
Consumer electronics: Function control for televisions, washing machines, and refrigerators.
Automotive electronics: Engine control, safety systems, navigation systems.
Industrial automation: Process control, parameter monitoring, operation of industrial robots.
Medical systems: Measurement of blood pressure, glucose, defibrillators, ventilators.
Mobile devices: Control of user interfaces, wireless connectivity, and GPS modules in smartphones, tablets, and smartwatches.
Consumer electronics: TV remote controls, Blu-ray players, digital cameras and any customer’s device.
Internet of Things (IoT): Light bulbs, motion sensors, and thermostats that communicate with each other and with the cloud.
To get an idea of how big the market for microcontrollers is, we can take a look at the graph below which shows the size of this market together with an estimate for the coming years.
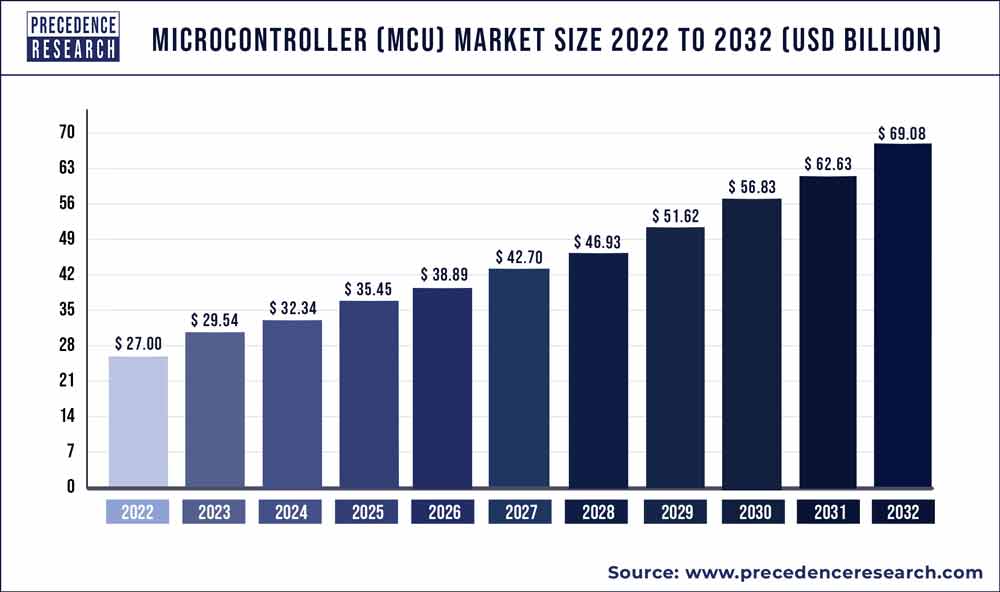 Microcontroller Market Size, Statistics, 2021 to 2030
It has to be noted that nowadays embedded platforms evolved and with the development of their components, they have become cheaper. Depending on the use case, the price of the single board doesn’t have to be a constraint. For example, in the case of advanced medical systems, the price of a single device may easily reach up to half a million dollars. In such cases, it’s easier to pick up a powerful microcomputer with embedded Linux, Windows embedded, embedded Android, or any high-level system.
Though, this blog post is dedicated to embedded systems running on MCUs, embedded is nowadays not only about low-level electronics and bare-metal systems. It’s rather about so-called “closed systems”.
OK, we already know what microcontrollers are, so it’s time to program something for them…but how?
Well, this is where it gets complicated because there is no clear answer as to how to program microcontrollers on embedded platforms. After all, every model is a different technology. Most of them, however, work under the control of C/C++ languages, although it is sometimes possible to use Python, for example. So as you can see, embedded software development can be a little tricky.
But if, like me, you want to use the benefits of the Qt framework – a complete graphics framework, well there you are…. in good hands 😉. Here comes Qt for MCUs!
To describe what Qt for MCUs is I will use the definition from the official Qt framework documentation:
Qt for MCUs 2.6 offers a lightweight graphics framework and toolkit that enables you to design, develop, and deploy graphical user interfaces (GUI) on microcontrollers (MCU). It lets you run the application either on bare metal or a real-time operating systems.
Sounds like everything we need! As an aside, this definition uses the terms ‘bare metal’ and “real-time operating systems” so I’m already explaining what that is:
In embedded programming, “bare metal” refers to writing software without using an operating system. It involves direct programming of the microcontroller, providing precise control over hardware aspects. While this approach allows direct access to hardware resources, it requires careful attention to low-level details.
A Real-Time Operating System (RTOS) is an operating system optimized for handling real-time tasks, ensuring quick and reliable responses to events within specified time frames. RTOS provides task scheduling, interrupt handling, and synchronization features, making it suitable for complex applications like flight control systems, automotive ABS systems, and industrial automation. In contrast to “bare metal,” RTOS introduces an abstraction layer, easing the management and development of more sophisticated embedded systems. It is not the same as embedded Linux.
It is also worth mentioning that Qt supports multiple platforms from various producers such as NXP, Renesas, STM, and many others. There is a whole subpage in the documentation with a list of supported boards.
Using Qt for MCUs, we can create applications with a graphical user interface but there is one thing to bear in mind. When developing embedded systems with GUI, it is important to remember to consider the performance of the hardware. This often has a lot to be desired depending on the chosen target platform.
When writing user interfaces using QML for, say, desktops or smartphones, we don’t worry so much about performance because our devices are equipped with very powerful components anyway. (For example, an average computer processor has a clock speed of several gigahertz, and microcontrollers have a clock speed of just several megahertz, so we have a difference of 1000 times!).
For this reason, the “ordinary” Qt framework was unsuitable for microcontrollers, so the experts at the Qt company created something more suitable: Qt Quick Ultralite. Again, I think this is best described by quotations from the documentation:
Qt Quick Ultralite brings the key graphical user interface features of Qt to resource-constrained embedded systems powered by microcontrollers (MCU). It provides a rich QML API set for building fluid GUIs, and an efficient graphics engine to render Qt Quick-based graphical user interfaces (GUI).
Qt Quick Ultralite is aware of the resource constraints on the MCU platforms, such as memory footprint and CPU cycles. It enables your application to perform optimally with the available resources on these MCU platforms.
For the curious, I recommend reading the documentation to get better familiar with it. For the moment, the only thing we need to know about it is that it works like a regular Qt framework only with a few limitations (for example fewer features from the Qt Multimedia module).
It has to be admitted that for building software on very limited hardware there are still more light-weight solutions than Qt for MCUs.
Licenses Used for Qt for MCUs – Some Complexities
All right, I’m sure you’re already a little excited and your hands are burning to program something! So let me cool your enthusiasm a little (sorry 😥).
A topic that needs to be addressed is the Qt for MCUs licensing model. At the time of writing this blog post, Qt for MCUS is available in two commercial licenses: Qt for Device Creation Professional and Qt for Device Creation Enterprise. So if you want to create software using Qt for MCUs, you need to get a Qt commercial license.
However, if you are willing to test Qt for MCUs then you have the option to apply for a limited-time license. For this, however, you will need to contact the Qt Company.
The news that made me very happy recently was that from October 2023, Qt for MCU is also available as a Qt Educational License, so if you are a student you can use it to learn the tool!
If you need help with choosing the right license for you, then you can take advantage of our consultancy offer for Qt licensing 😉. There is still a possibility to use Qt for free in some cases.
Currently avaiable licenses options
Example of Creating GUI Programs with Qt for MCUs
Well, we know the theories, it’s time to put them into practice. As an example, I will present a simple application, displaying a list of devices supported by Qt for MCUs.
Of course there are many more supported platforms 😋
The rest of this article will show and explain how to write this type of application. As mentioned, I ran it on an emulator but if you have a microcontroller with a screen handy, go ahead and try to run it on it!
Example – First Steps!
Before we proceed with the code itself, two things need to be done:
Download from the Qt Maintenance tool the appropriate kit for your board like STM32 (for example STM32F469I-DISCOVERY)
I used newest version avaiable Qt for MCUs 2.6
Prepare the hardware – this step is, however, optional, as within Qt for MCU we get a desktop emulator kit, which I used myself. You can set all of this up in Qt Creator IDE.
You should see your desktop kit here
If you have set everything up, all you have to do is create a new project by selecting the appropriate template and that’s it. Contact us in case you want to set up a working build chain for your project.
Example – CMakeLists.txt and .qmlProject Files
After creating the project, a familiar file structure appears before our eyes, but it is slightly different. Let’s start by discussing the CMakeLists.txt file.
cmake_minimum_required (VERSION 3.21.1)

project(QtForMCU VERSION 0.0.1 LANGUAGES C CXX ASM)

find_package(Qul)

qul_add_target(QtForMCU QML_PROJECT QtForMCU.qmlproject GENERATE_ENTRYPOINT)

qul_target_generate_interfaces(QtForMCU DeviceModel.h)

target_link_libraries(QtForMCU PRIVATE Qul::Controls)

app_target_setup_os(QtForMCU)
As you can see, we have come up with several functions that start with the prefix qul_. These are the instructions used to create a project based on Qt Quick Ultralite. If you look at them, they don’t differ much from standard CMake instructions.
The next file is PROJECT_NAME.qmlProject. This is an additional file that is used to define e.g. resources, qml files etc. It is quite large so I will only paste the most important part.
QmlFiles {
    files: ["QtForMCU.qml"]
  }

  ImageFiles {
    files: [
      "resources/nxp.png",
      "resources/renesas.png",
      "resources/stm.png",
      "resources/infineon.png",
    ]
  }

  FontFiles {
    files: [
      "resources/Roboto/Roboto-Regular.ttf"
    ]
  }

  TranslationFiles {
    files: []
  }

  InterfaceFiles {
    files: ["DeviceModel.h"]
  }

  ModuleFiles {
    files: []
    // Uncomment for adding Qul modules
    MCU.qulModules: [
      "Qul::Controls",
      // "Qul::ControlsTemplates",
      // "Qul::Shapes",
      // "Qul::Timeline"
    ]
  }
Example – Interface File – DeviceModel.h
It is time to add some logic to our application. Using Qt for MCU, the concept of the Qt interface framework module is applied (something similar to normal logic classes). These are automatically exposed to QML, by adding them in the .qmlProject file.
#ifndef DEVICEMODEL_H
#define DEVICEMODEL_H

#include <qul/model.h>
#include <platforminterface/allocator.h>
#include <string>

struct Device
{
    std::string name = "";
    int clockSpeed = 0;
    std::string imageSource = "";
};

inline bool operator==(const Device &lhs, const Device &rhs)
{
    return lhs.name == rhs.name &&
           lhs.clockSpeed == rhs.clockSpeed &&
           lhs.imageSource == rhs.imageSource;
}

struct DeviceModel : Qul::ListModel<Device>
{

public:
    DeviceModel() {
        Device nxp{"MIMXRT1050-EVKB", 600, "resources/nxp.png"};
        Device renesas{"EK-RA6M3G", 120, "resources/renesas.png"};
        Device stm{"STM32F769I-DISCOVERY", 216, "resources/stm.png"};
        Device infineon{"TRAVEO T2G TVII-C-2D-4M Evaluation Kit", 240, "resources/infineon.png"};

        m_data.push_back(nxp);
        m_data.push_back(renesas);
        m_data.push_back(stm);
        m_data.push_back(infineon);
    }

    int count() const override {
        return m_data.size();
    }

    Device data(int index) const override {
        return m_data[index];
    }

private:
    Qul::PlatformInterface::Vector<Device> m_data;
};

#endif // DEVICEMODEL_H
In the beginning, we define ourselves as a data structure (Device). This has three fields: the device name, the clock speed (timing), and the path to the graphics.
Next, we need to define a comparison operator for this structure. In this case, two instances of the Device class are the same if all fields are the same.
Next, we create our model. Here it is a class that inherits from Qul::ListModel<Device> because our model will be a list of objects of the Device class. Using this class requires the implementation of the virtual count() and data() functions.
In a private field of the class, we create Qul::PlatformInterface::Vector<Device> m_data in which we store our objects.
In sum, the structure of this file very much resembles the implementation of a custom class based on QAbstractListModel.
Now all you need to do is create a simple GUI in QML and you’re done! Run it from Qt Creator and you will see the effect in the emulator.
import QtQuick
import QtQuick.Controls

Rectangle {
  id: root

  width: 640
  height: 480

  color: "#0b2823"

  DeviceModel {
    id: deviceModel
  }

  ListView {
    id: deviceListView

    anchors {
      fill: parent
      margins: 35
    }

    clip: true

    model: deviceModel
    spacing: 35

    delegate: Rectangle {
      color: "#218165"

      width: deviceListView.width
      height: 400

      Image {
        id: deviceImage

        anchors {
          left: parent.left
          top: parent.top
          bottom: parent.bottom
          leftMargin: 25
          topMargin: 75
          bottomMargin: 75
        }

        width: height

        source: model.imageSource
      }

      Text {
        id: nameText

        anchors {
          top: deviceImage.top
          topMargin: 10
          right: parent.right
          rightMargin: 20
          left: deviceImage.right
          leftMargin: 20
        }

        wrapMode: Text.WordWrap

        text: "Model name:\n" + model.name
        font.pixelSize: 32
      }

      Text {
        id: clockSpeedText

        anchors {
          top: nameText.bottom
          topMargin: 20
          right: parent.right
          rightMargin: 20
          left: deviceImage.right
          leftMargin: 20
        }

        wrapMode: Text.WordWrap

        text: "Clock speed:\n" + model.clockSpeed + " MHz"
        font.pixelSize: 26
      }
    }
  }
}
What are the Advantages of using Qt Technology for Embedded Devices?
I hope the example has helped you to understand Qt for MCUs. I want to conclude with a few more interesting things about this topic. In normal conditions Qt is used for creating cross-platform applications, so why Qt is also a complete graphics framework and a good choice for embedded platforms?
As you may have noticed, the use of microcontrollers is now very common. The example I presented is quite simple, but what if you have a complex embedded Linux project where aspects such as performance or security are extremely important? For more “professional” applications, Qt has prepared some useful tools:
Qt Application Manager – Qt Application Manager simplifies the lifecycle of applications, offering developers an efficient way to install, control, and update software on embedded Linux devices.
Qt Safe Renderer Module – Enhances the platform’s appeal for safety-critical applications, particularly in industries such as automotive. The module ensures a secure rendering process, crucial for applications where safety is paramount.
Qt Automotive Suite – Offers a comprehensive suite of tools and libraries exclusively designed for automotive development. This suite addresses the specific needs of the automotive industry, providing solutions for infotainment systems, instrument clusters, and more.
Boot2Qt – It is a specialized solution designed to streamline the development and deployment of Qt applications on embedded linux devices. It acts as a dedicated platform that optimizes the booting process, ensuring rapid and efficient startup for applications built with the Qt framework
Qt Design Studio – Empowers developers with a sophisticated tool for designing and prototyping user interfaces tailored specifically for embedded applications. This facilitates the creation of visually compelling and user-friendly interfaces.
Of course, there is much more. If you need anything else, I encourage you to read Qt’s detailed API documentation or contact Qt company (or us 😊) directly.
And that’s all! I hope that reading this blog post has shown you how to program on embedded platforms using Qt for MCUs. Feel free to contact us if you have any questions, bye!


Let's face it? It is a challenge to get top Qt QML developers on board. Help yourself and start the collaboration with Scythe Studio - real experts in Qt C++ framework.
Discover our capabilitiesUsers of embedded devices – from industrial controllers to consumer electronics – are often unaware of hidden vulnerabilities that threaten […]
Graphical user interfaces (GUIs) are becoming more and more important in embedded devices – from home appliances to medical equipment […]
Technical managers in the embedded space often face a classic challenge: integrating industrial communication protocols into modern applications. One such […]
