Trading Software Development: A Comprehensive Guide
Trading software refers to the digital platforms and systems that enable investors and financial institutions to buy, sell, and manage […]

Join us at Qt C++ Warsaw Meetup - 21.08.2025
Sign up for free!
Are you wondering how to use D-Bus with Qt 6? If so, you’ve come to the right place! In this post, we will take a closer look at what this mechanism is by supplying you with the necessary theoretical knowledge. We will then try to turn the theory into practice and give you an example of how to use this system in a Qt application.
In the meantime, if you need help with C++ Development then feel free to contact us.
D-Bus is a message bus system that enables an inter-process communication (IPC) mechanism originally developed for Linux. It’s language-agnostic, which means it can be used with various programming languages, including C++. By using its API in C++, you can create both client and service applications that communicate with one another.
D-Bus employs a binary message-passing protocol ensuring swift and efficient communication between software entities, including hardware driver services. Additionally, D-Bus facilitates inter-process communication through various mechanisms, such as Remote Procedure Calling (RPC), enabling one process to invoke methods or functions in another process.
D-Bus is well-suited for same-machine communication, enabling processes running on the same computer to exchange information efficiently. Whether it’s system services interacting with user applications or various components of a desktop environment coordinating tasks, D-Bus simplifies and streamlines communication among processes residing on the same machine. This adaptability makes this message bus system a valuable tool for enhancing collaboration and modularity within a computing environment.
Without one unified bus, processes would need to communicate directly with each other establishing one-to-one IPC channels. With the same bus, it is possible to establish many-to-many communication using one unified protocol.
Inter-process communication refers to the ability of different processes or software components to exchange information and communicate with each other within a Linux or Unix-like operating system. D-Bus provides a standardized and efficient way for these normal user processes to interact seamlessly. It’s commonly used with hardware devices attached to some main microcomputer. Such a scheme creates then point to point network.
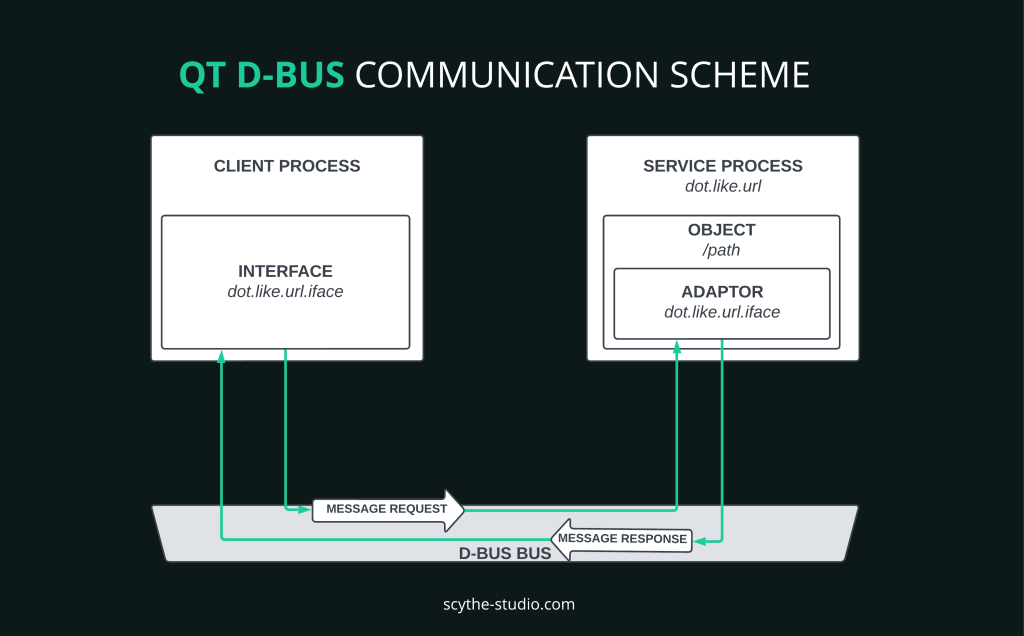
D-Bus plays a crucial role in properly routing messages between different processes and services. It ensures that messages are directed to their intended destinations, whether within a local session or across a network, ensuring efficient and secure communication among software components. The two primary components that are used for this purpose are the message bus daemon and client applications.
The daemon (dbus-daemon) is a system-wide process that manages communication between various applications. It acts as a message broker, allowing processes to send and receive messages. There are two types of this message bus daemon daemons: a system bus and a session bus. The system bus is system-wide and allows communication between different users and system services. Session bus is specific to a user’s session and is used for communication between applications within the same user session. Each user typically has their own session bus.
Client applications are processes that use D-Bus to communicate with each other. These applications can be written in different languages, including C++. They use the D-Bus API to send and receive messages. Although D-Bus is typically used for many-to-many communication, you can design it in a way that there is one central server application being a main intersection of all the communication going on.
First of all, we have to understand the terminology.
Service is a collection of object paths in a session or system bus. The service process holds shared objects accessible thanks to the adaptor.
An Adaptor is used to register methods, signals, and properties into an object path. Thanks to it, we have a way to control our shared object placed in the object path. An object path is a location specifying where we can access a shared object. Adaptor lives on a service process side.
When you want to call a method from the object path on the client process side, you have to use a specific Interface (hence the name) that makes it possible. It’s part of Qt’s magic. An adaptor and corresponding interface should have the same d-bus interface names. You will see that in action later.
Messages are directed to specific destinations, ensuring efficient communication without the need for broadcasting. Client and service knows where to send messages by client and service bus names. Signal messages, inspired by Qt’s Signals and Slots mechanism, provide a one-to-many communication approach through an “opt-in” mechanism, allowing multiple parties to participate.
To register services and object paths on a session or system bus, we use the QDBusConnection class.
To practice D-Bus we’re going to create a simple Shop-like application, where we’ll create products and add them to shop via D-Bus. A list of products will be fetched and shown by the client application with a little bit of GUI. On the service side, we’re going to have a shop object shared with QDBusConnection.
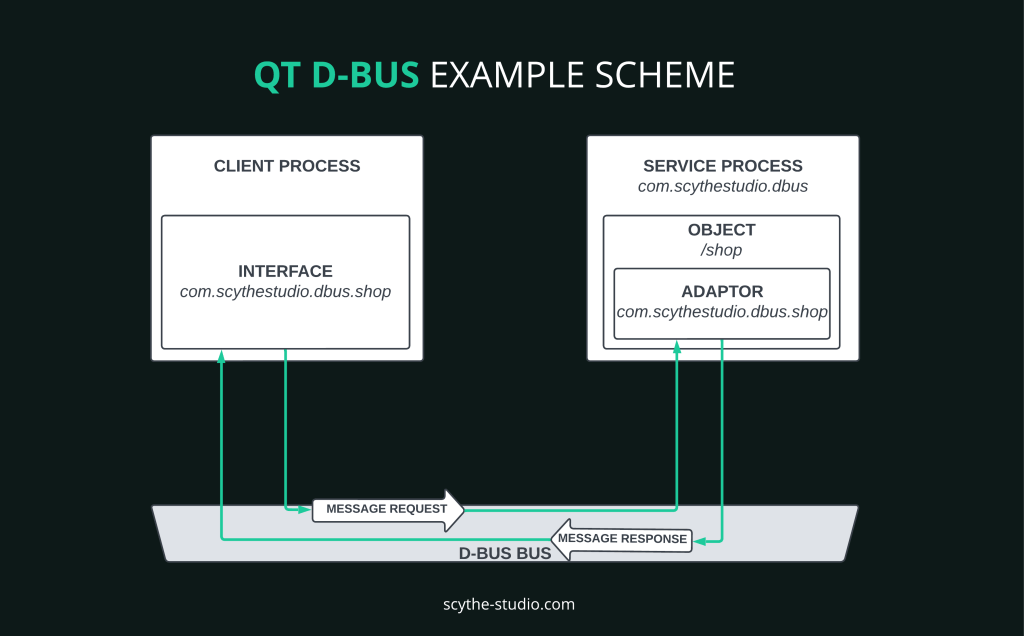
Next, we will register the D-Bus service name, object path for the shop, and every method and signal by Qts Adaptor. At the end, we’ll be adding products to the shop’s list by interface. Below is the GIF with the expected outcome:
The first step is to create our Product class, which will be our dataset. The type of data that we want to send via D-Bus should be compatible with QDbus. Here you can see supported types.
I’ve created my own custom Product class which contains name (QString) and amount (int). It is important to add those few things to the class to allow D-Bus integration.
friend QDBusArgument &operator<<(QDBusArgument &argument, const Product &product);
friend const QDBusArgument &operator>>(const QDBusArgument &argument, Product &product);
static void registerMetaType();
In the registerMetaType method, we declare all the needed types not supported by default. In QDBusArgument operators we have to declare which and how big is the structure that we want to send.
void Product::registerMetaType()
{
  qRegisterMetaType<Product>("Product");
  qRegisterMetaType<QList<Product>>("QList<Product>");
  qDBusRegisterMetaType<Product>();
  qDBusRegisterMetaType<QList<Product>>();
}

QDBusArgument &operator<<(QDBusArgument &argument, const Product& product)
{
  argument.beginStructure();
  argument << product.m_name;
  argument << product.m_amount;
  argument.endStructure();
  return argument;
}

const QDBusArgument &operator>>(const QDBusArgument &argument, Product &product){
  argument.beginStructure();
  argument >> product.m_name;
  argument >> product.m_amount;
  argument.endStructure();
  return argument;
}
Now we can go and create our Shop class. It will be our main class, shared by QDBusConnection, which will contain the list of products. It will have addProduct, getProducts methods, and productAdded signal. We create a class as we normally do, but we have to add Q_CLASSINFO which associates extra information to the class, which is available using QObject::metaObject().
It will be used by special Qt tools. The first argument is the name of the property and it has to say like it is. The second is the value and it should be dot separated.
class Shop : public QObject
{
  Q_OBJECT
  Q_CLASSINFO("D-Bus Interface", "com.scythestudio.dbus.shop")
public:
  explicit Shop(QObject *parent = nullptr) {};
  virtual ~Shop() {};
public slots:
  void addProduct(const Product& product);
  QList<Product> getProducts();
signals:
  void productAdded(const Product &product);
private:
  QList<Product> m_products = {Product("Apple", 21), Product("Orange", 37)};
};
void Shop::addProduct(const Product &product)
{
  m_products.append(product);
  emit productAdded(product);
}

QList<Product> Shop::getProducts()
{
  return m_products;
}
XML files in D-Bus serve to define and structure the interfaces and objects offered by services. It is let’s say D-Bus specification. They also provide documentation, aid in code generation, and sometimes contain access control policies, ensuring standardized and secure communication between processes.
In this step, we’re going to generate an XML file. To do so we’re going to use an amazing tool built in Qt, which is qdbuscpp2xml. It gets our Shop class and converts every slot and signal and saves it to an XML file. The command that we’re going to use is:
qdbuscpp2xml <header file> -o <xml output file>
Watch out, because qdbuscpp2xml generates only a declaration of methods and signals with supported types. If the type is not supported, you must manually add a declaration.
For example: I created SimpleShop with one method.
class SimpleShop : public QObject
{
  Q_OBJECT
  Q_CLASSINFO("D-Bus Interface", "com.scythestudio.dbus.shop")
public slots:
  int getNumber() {
  return 2137;
}
};
After running qdbuscpp2xml SimpleShop.h -o SimpleShop.xml I’ve got the SimpleShop.xml output file:
<!DOCTYPE node PUBLIC "-//freedesktop//DTD D-BUS Object Introspection 1.0//EN" "http://www.freedesktop.org/standards/dbus/1.0/introspect.dtd">
<node>
  <interface name="com.scythestudio.dbus.shop">
    <method name="getNumber">
      <arg type="i" direction="out"/>
    </method>
  </interface>
</node>
If we want to run it on the original Shop.h, which doesn’t contain slots with supported types, Shop.xml file will be empty and the console won’t return any error messages.
<!DOCTYPE node PUBLIC "-//freedesktop//DTD D-BUS Object Introspection 1.0//EN" "http://www.freedesktop.org/standards/dbus/1.0/introspect.dtd">
<node>
</node>
So we have to write it manually. But no worries, I’ll guide you through that!
In XML, we’ll use interface, method, signal, arg, and annotation markups.
<interface> will describe interface that is used to control our shared object.
<method> is for method registration of our shared object.
<signal> is for registration signal from our shared object.
<arg> is for argument that comes in or out method or signal.
<annotation> is a reference to our custom type in <arg>. If argument is supported type by D-Bus, you don’t have to include this.
We can take as an example addProduct from Shop.h.
void addProduct(const Product& product);
addProduct has:
method name “addProduct”
One argument is named “product” and type as Product. Product is a class with integer and string, so the type is (is). That argument comes with a method so the direction is “in”. If the method would return Product direction of argument should be “out”. If we have multiple arguments we have to add more <arg.. /> markup.
Because Product is a custom type, we have to write annotation. The name (org.qtproject.QtDBus.QtTypeName.) is always the same, but the last part is changing. In0 means that our custom type is first in arguments order. In value we have to put our declared (by Q_DECLARED_METATYPE(<Type>)) Type. Same it is for returned argument, but instead of “In0” it should be “Out0”. Annotations number should be the same as custom argument types.
So our addProduct should look like this:
<method name="addProduct">
  <arg name="product" type="(is)" direction="in"/>
  <annotation name="org.qtproject.QtDBus.QtTypeName.In0" value="Product"/>
</method>
To better understand I can provide an example for the method removeProduct, where there will be one supported and two custom arguments.
void removeProduct(const Product& product, int index, const Date& date);
After writing all the markups for shops methods and signals our complete Shop.xml should look like this:
<!DOCTYPE node PUBLIC "-//freedesktop//DTD D-BUS Object Introspection 1.0//EN" "http://www.freedesktop.org/standards/dbus/1.0/introspect.dtd">
<node>
<interface name="com.scythestudio.dbus.shop">
<method name="addProduct">
<arg name="product" type="(is)" direction="in"/>
<annotation name="org.qtproject.QtDBus.QtTypeName.In0" value="Product"/>
</method>
<method name="getProducts">
<arg type="a(is)" direction="out"/>
<annotation name="org.qtproject.QtDBus.QtTypeName.Out0" value="QList<Product>"/>
</method>
<signal name="productAdded">
<arg type="(is)" direction="out"/>
<annotation name="org.qtproject.QtDBus.QtTypeName.Out0" value="Product"/>
</signal>
</interface>
</node>
We have our product, Shop class and shop xml file ready. We’re so close! Now it’s time for Qt magic!
To create a D-Bus interface and D-Bus adaptor cpp classes we use `qdbusxml2cpp`
We are going to use the following command:
qdbusxml2cpp <xml file> -i <h file> -a <adaptor file output>
qdbusxml2cpp <xml file> -i <h file> -p <interface file output>
-i stands for what we want to include in our output files. We have to import all datasets that adaptor and interface will be using.
-a is for adaptor output file.
-p is for interface output file.
In our case, the command will look like this.
qdbusxml2cpp Shop.xml -i Product.h -a ShopAdaptor
qdbusxml2cpp Shop.xml -i Product.h -p ShopInterface
Remember. If you run the command with files in other directories, run it where your adaptor/ interface will be while building your project. qdbusxml2cpp gets your arguments and puts it straight into imports, so it’s important to make sure every path is good.
That’s it. We’ve created an adaptor and interface for shop class.
Above could be actually achieved with CMake. Check Qt’s documentation for that.
To start a service process, we have to do two more things in our shop class.
Declare ShopAdaptor as a shop class member and instantiate in with a pointer to this object as the parent. By this, we create a connection, so when we call an interface method, a message will be passed and the method will be executed by a shared object in the service process.
startDBusService method. In this method, we’re going to connect the adaptor with this shop object, register the d-bus service (providing network hostnames dot separated), object path, and share this shop object.
void Shop::startDBusService()
{
  Product::registerMetaType();
  m_adaptor = new ShopAdaptor(this);
  auto connection = QDBusConnection::sessionBus();
  if (!connection.registerService("com.scythestudio.dbus"))
  {
    qFatal("Could not register service!");
  }

  if (!connection.registerObject("/shop", this))
  {
    qFatal("Could not register Chat object!");
  }
}
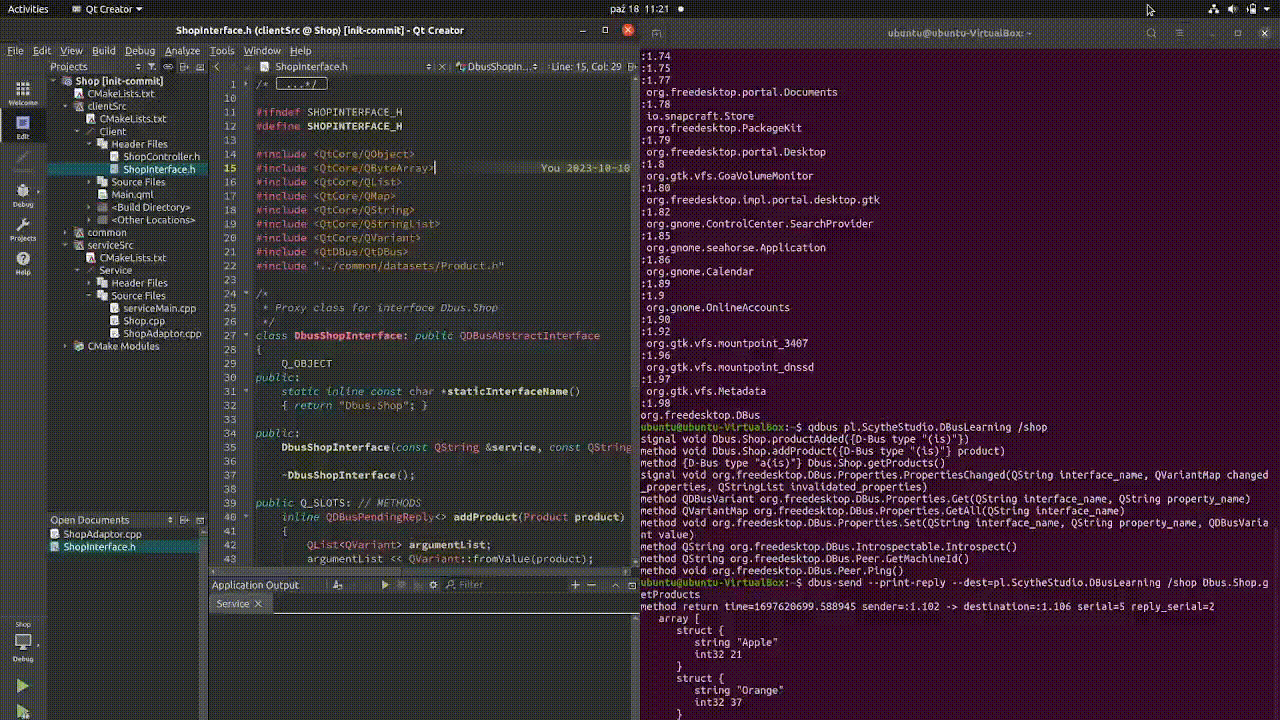
Here we’re good to go and start a service process. After we start the service process, we can verify if everything works fine. To do so we’re going to use Qt’s command line tools.
qdbus – shows all the running services.
~$ qdbus

(...)
:1.295
  com.scythestudio.dbus
(...)
qdbus <service> – shows declared object paths in the service.
~$ qdbus com.scythestudio.dbus
/
/shop
dbus-send –print-reply –dest=<service> <object path> <interface>.<method name> – can print a reply for object method.
~$ dbus-send --print-reply --dest=com.scythestudio.dbus /shop com.scythestudio.dbus.shop.getProducts
method return time=1696932139.293770 sender=:1.101 -> destination=:1.104 serial=3 reply_serial=2
   array [
      struct {
         string "Apple"
         int32 21
      }
      struct {
         string "Orange"
         int32 37
      }
   ]
It works flawlessly, doesn’t it?
The last step is to create ShopControllerat which has nothing to do with D-Bus specification. It’s just for the sake of making this example more complete and doing something with UI. It will be exposed to the QML with a list of products fetched from the shared shop object. It is possible thanks to ShopInterface which allows us to have control under shared “Shop” object.
In the ShopController constructor, we have to connect the interface to the service and register the Product type.
m_interface = new ComScythestudioDbusShopInterface("com.scythestudio.dbus",
"/shop", QDBusConnection::sessionBus(), this);
Product::registerMetaType();
We’re all set! We can access the remote shop via an interface!
If we want to fetch a list of products
m_interface->getProducts().value();
And add product to the list.
m_interface->addProduct(product);
Pretty cool, right?
At this point, you should know what the D-Bus mechanism is and how you can implement this way of inter-process communication in your project. If you still encounter problems, consider our Qt development services. We can certainly help you with most of the Qt, QML, and C++ coding aspects.
If you need to get the entire codebase of the example used for this post, visit our GitHub profile. You can find more content about the Qt framework in our other blog posts. Follow Scythe Studio’s LinkedIn profile to get up-to-date with news from us!


Let's face it? It is a challenge to get top Qt QML developers on board. Help yourself and start the collaboration with Scythe Studio - real experts in Qt C++ framework.
Discover our capabilitiesTrading software refers to the digital platforms and systems that enable investors and financial institutions to buy, sell, and manage […]
Verification and Validation (V&V) are two pillars that ensure a medical device is safe, effective, and compliant before it ever […]

From medical devices and smart vehicles to industrial controllers and consumer electronics, embedded systems are everywhere—and increasingly connected. But with […]
