
Medical Device Prototype Development: From Software Design to Regulatory Testing
I’m not going to lie, a lot of the projects we do at Scythe Studio are related to the medical […]
Join us at Qt C++ Warsaw Meetup - 21.08.2025
Sign up for free!
Have you ever noticed that most professional software and games are available for all the most popular platforms? This is normal, because when creating an application you want it to be available to as many customers as possible. A wider audience means more interest in your product, but also more potential profits you can get from it. So it is worth releasing your app on several, different platforms, but how to do it?
Well, there are two possibilities. The first one is based on native app development. In short, it involves the use of language and toolkits that are dedicated to a specific platform – for example, for Android it’s Java using Android Studio, and for iOS it’s Swift along with XCode IDE. The native approach has its advantages, but also disadvantages. The most important advantage is undoubtedly the possible achievable performance-optimized code in a native language will run the fastest, giving access to the built-in functionality of the system in addition. The disadvantage is of course the difficulty, time-consumption, and price of implementation – if you want to release an application for three different systems, you need to hire three independent teams of programmers. Such teams would work separately, which would have a significant impact on the application release date. In addition, that application must also be maintained, which is associated with the constant payment of these teams. If you are wondering how to reduce project costs or want to learn what a technology stack is, take a look at this post.
So how to avoid high costs with little loss of performance? Use a cross-platform framework. These types of frameworks allow you to develop software for multiple, different platforms using the same source code – no need to rewrite your application when you need to add new functionality or support for a new target platform. Of course, cross-platform approaches do not offer that easy access to all native components, but they offer instead faster, cheaper, and more efficient software production.
So which cross-platform framework is best? Well, it depends on what type of target platforms you’re interested in – there are many different frameworks, and it’s impossible to list all of them in one post. So we will focus today on 4 of the best desktop cross-platform frameworks, and other platforms will be described in a separate post.
Let’s start our review with JavaFX, a cross-platform framework based on pure Java. Initially, this framework was included with JDK versions 8-10 and was the main GUI environment for Java, replacing the previously used Swing. Starting with JDK 11, however, it was only available as an external tool included in OpenJDK as part of the OpenJFX project.
JavaFX allows software development for platforms such as Windows, Linux, Mac, Android, iOS, and web browsers. Initially, embedded systems were also supported, but this support was withdrawn with JDK 8u33 for ARM. JavaFX applications can be developed using pure Java as well as available libraries – we are also talking about the popular Maven package manager, which can be integrated with JavaFX. JavaFX, of course, comes with a set of ready-made libraries, so that the developer does not have to reinvent the wheel, but instead can use the prepared solutions.
JavaFX uses FXML (language based on XML) files to create the appearance of windows. Each tag represents a separate object in the application to which we can give appropriate properties, position, and nest other components. The base component is a single container into which we put other objects. Such a component then only needs to be loaded in the Java code. Remember that the type used should be consistent with that declared in the file. We can also use a CSS file to style selected components.
To make working with FXML files easier, there’s a tool called Scene Builder. It is an editor that allows you to create the appearance of your application easily. To add a component, simply drag and drop it on the workspace and then adjust its properties in the side window. If we have chosen AnchorPane as the base component, positioning components is even easier because they “stick” to an invisible grid that divides our application into equal parts.
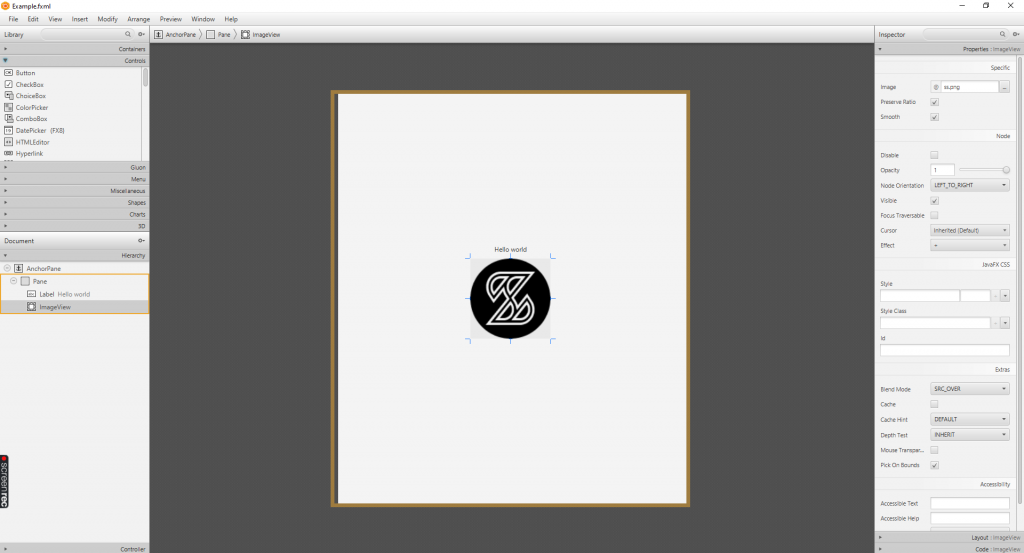
Scene Builder in action
Unfortunately, JavaFX is not without its drawbacks. As most of you probably know, programs created in Java run in a virtual machine, which results in higher RAM consumption and significant CPU usage. The result is that programs created in JavaFX can run noticeably slow on some, weaker devices. Additionally, both JavaFX and JavaSwing are used less and less – these solutions are gradually being replaced by technologies such as Qt, JSF, Flutter, or Electron. Moreover custom drawing, and animations are not so simple to do – at least not as simple as in QML.
Below is a sample application design that we generated using Scene Builder (screen above):
<? xml version="1.0" encoding="UTF-8"?>

<? import javafx.scene.control.Label?>
<? import javafx.scene.image.Image?>
<? import javafx.scene.image.ImageView?>
<? import javafx.scene.layout.AnchorPane?>
<? import javafx.scene.layout.Pane?>


< AnchorPane accessibleText="″ xmlns:fx="http://javafx.com/fxml/1" xmlns="http://javafx.com/javafx/17">
   < children>
      < Pane layoutX="-7.0" prefHeight="768.0" prefWidth="660.0">
         < children>
            < Label layoutX="300.0" layoutY="283.0" text="Hello world" textAlignment="CENTER" />
            < ImageView fitHeight="150.0" fitWidth="200.0" layoutX="255.0" layoutY="309.0" pickOnBounds="true" preserveRatio="true">
               < image>.
                  < Image url="@ss.png" />
               </image>.
            </ImageView>.
         </children>.
      </Pane>.
   </children>.
</AnchorPane>.
So this is what the program looks like after launch:

Qt is a framework that we specialize in, but also a framework trusted by many global companies. This framework had its beginnings back in 1995, and since then it has been constantly developing. Qt has its heart created in pure C++ language, thanks to that it offers native-like performance. Initially, Qt was a framework fully dedicated to desktop platforms, which resulted in such deep development of the dedicated desktop module Qt Widgets. With the release of the 5th version of Qt, support for most mobile platforms as well as embedded systems was introduced.
Developing desktop applications in Qt requires knowledge of C++ (or Python, if you’re using PyQt) – in fact, basic knowledge of this programming language is enough here, because Qt comes with many, easy-to-use modules, which are additionally described in detail and understandable way in the documentation. A noteworthy module is Qt Quick, which allows you to create applications using the QML declarative language. It is a simple tool that looks like a combination of JSON, CSS, and JavaScript. The last of mentioned languages is part of QML, so we can directly use previously prepared js scripts. However, it is commonly accepted that the application logic is fully implemented in C++ and QML handles its appearance. That separation of logic and appearance allows us to achieve native-like performance, in a non-native way and cleaner software architecture.
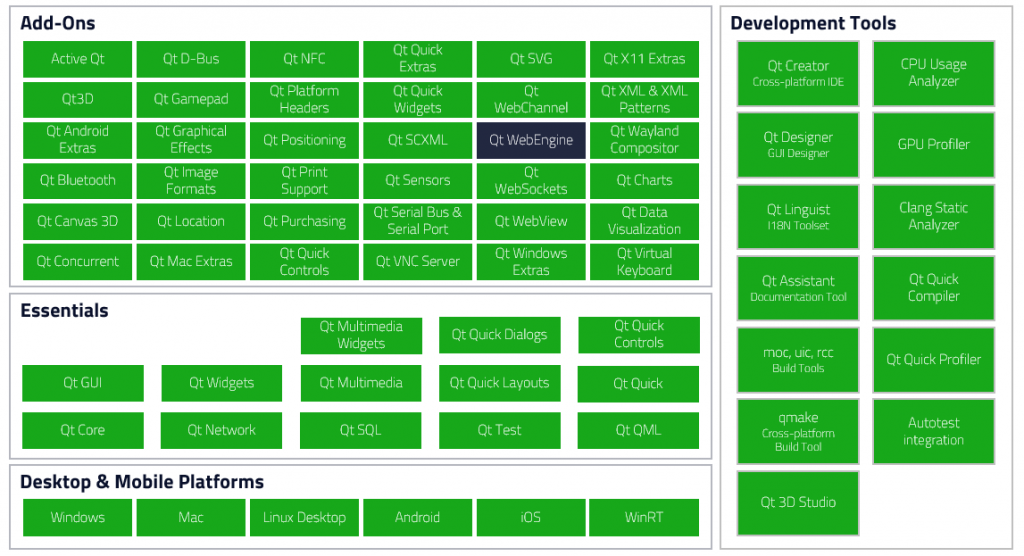
Qt, as a technology, has been chosen by many, global brands. AMD, Intel, Mercedes-Benz, Bosh, LG, Panasonic, Ubuntu – we could list without end. There is nothing surprising about it because Qt is a stable, mature solution. The attention of these corporations is certainly attracted by the mentioned above Qt Widgets, which is one of the most developed and advanced modules that allows you to create an efficient desktop application with little effort, making Qt one of the best cross-platform desktop frameworks. It’s also worth mentioning that the Qt framework, besides the previously mentioned Qt Widgets and Qt Quick modules, also comes with many other modules, thanks to which you can easily call native functionalities, using 100% of the potential of the target device. Additionally, the Qt framework includes the Qt Designer tool, which allows you to easily create the appearance of your application without knowing any programming language – similar to the previously mentioned Scene Builder.
Of course, like any other framework, Qt is not a silver bullet for every project. Qt isn’t such a widespread framework, which can make it difficult to find a specialist in this technology. Additionally, its low popularity is also reflected in the framework’s less extensive developer community.
Below you will find the code of a simple program, created in QML:
importing QtQuick 2.12
import QtQuick.Window 2.0

Window {
  id: root

  width: 640
  height: 640
  visible: true
  title: "Example window"

  Text {
    id: text

    anchors {
      bottom: image.top
      bottomMargin: 25
      horizontalCenter: image.horizontalCenter
    }

    text: "Hello world!"
  }

  Image {
    id: image

    width: 150
    height: 150
    anchors.centerIn: parent

    fillMode: Image.PreserveAspectFit
    source: "qrc:/assets/image.png"
  }
}
This is what our sample program looks like after running:

The next cross-platform desktop framework we will discuss today is Electron. Electron is an open-source framework created and developed by GitHub. It was first released in 2013, so it is a fairly young framework. Electron is available as a Node.js package and can be easily downloaded using the npm manager.
Electron allows you to create fully-functional desktop applications using technologies that are normally used in a web environment, such as HTML, JavaScript, and CSS. It uses a combination of the Chromium rendering engine and the Node.js environment to visualize the appearance of the application. It is worth mentioning here that Electron itself was created in C++ and Objective-C, and all its built-in methods and functionalities are available from JavaScript in the application we are creating.
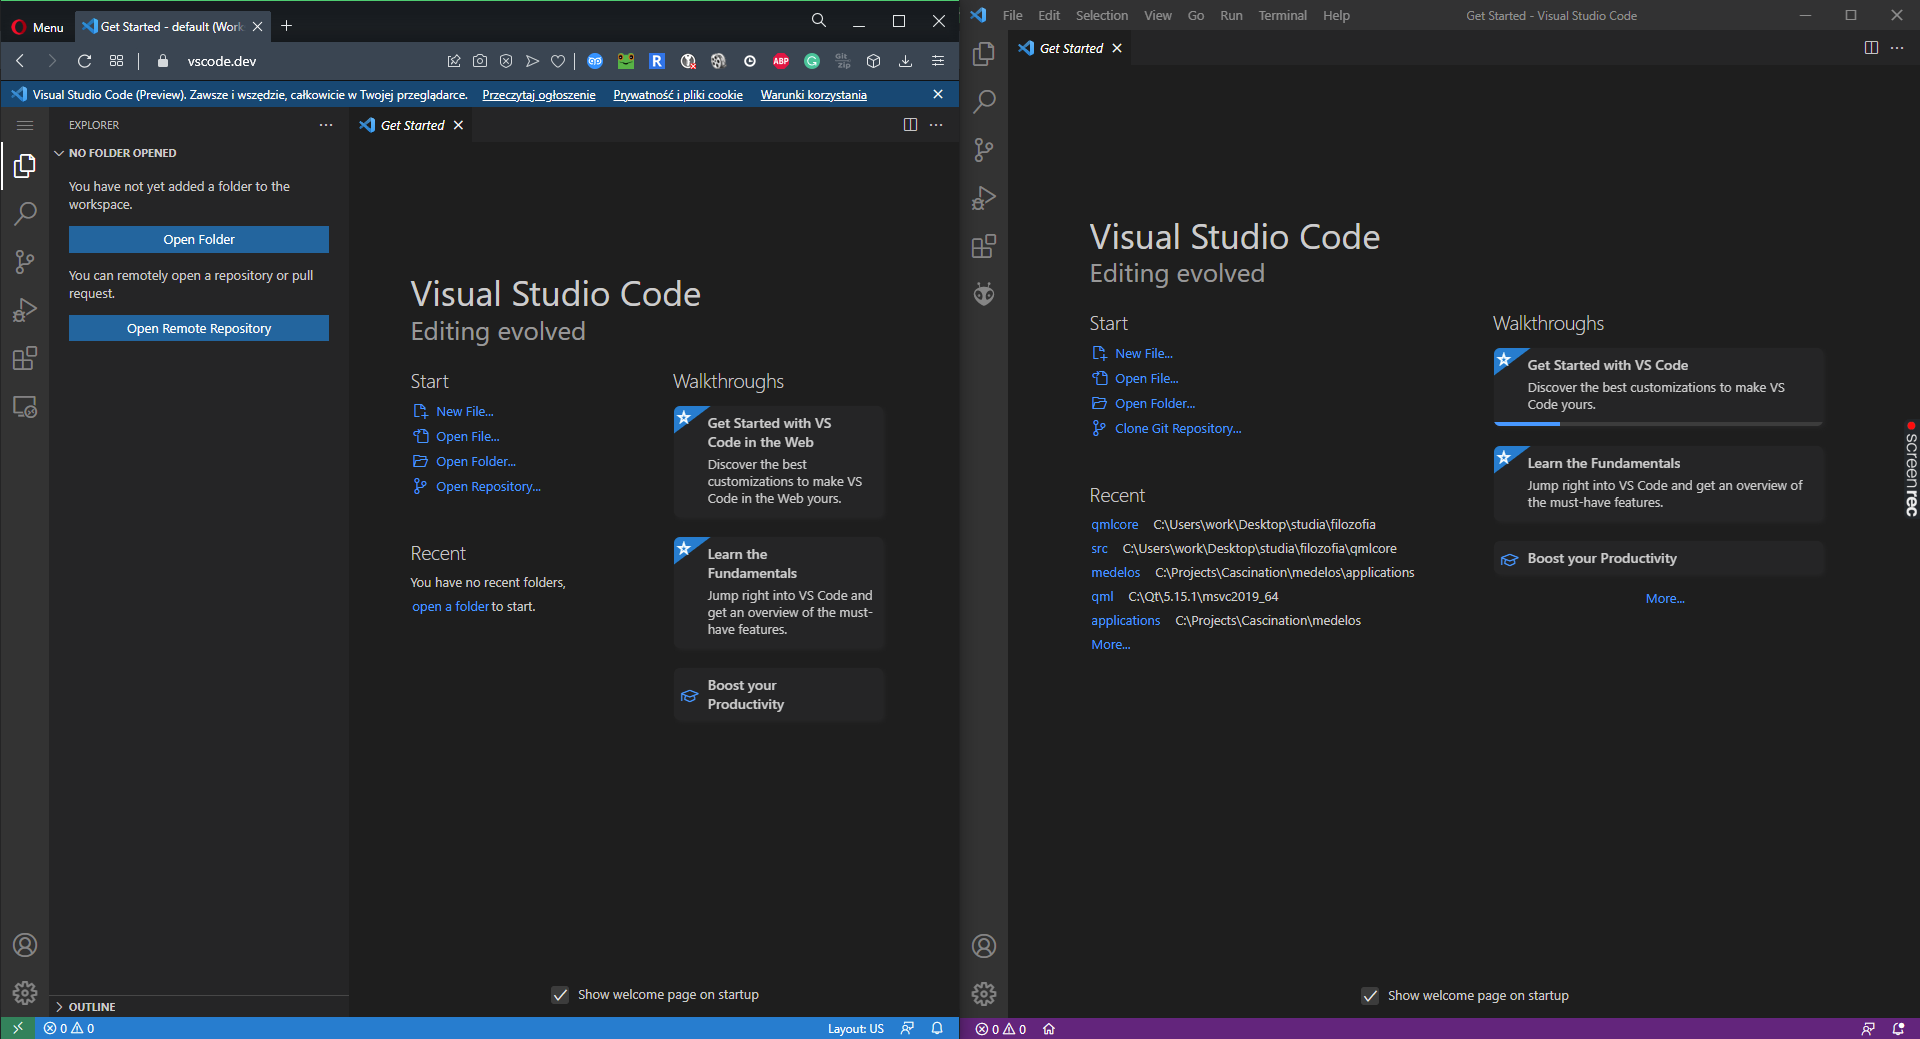
Visual Studio Code as web app vs Visual Studio Code as Electron desktop app
An application created in Electron contains 3 main elements: index.html, main.js, and package.json. The first file contains the implementation of the application appearance, which we create using HTML. Here, we define and position the application elements, giving them the appropriate properties – similar to FXML in JavaFX. The main.js file contains the implementation of the application logic – this is where the more complicated scripts of our program should be placed. The last of these three files contains metadata about our application that is used as package information by Node.js. In this file, we need to include information about our application, such as the title, version, as well as a path to the file containing the logic implementation (by default main.js).
Many, well-known applications are based on Electron, such as Discord, Skype, Visual Studio Code, WordPress Desktop, Github Desktop, Microsoft Teams and many others. You will notice that each of them has its counterpart on the web platform. Having a ready-made web design, you can quite easily port it to a desktop application using Electron. Of course, it also works the other way round – by creating a basic application in Electron we can later use its source code to create a web application.
However, Electron has its own disadvantages. First of all, like JavaFX, it uses a very large amount of system resources while offering much worse performance than native apps. Electron is also aimed directly at desktop platforms – it is impossible to build an application directly for Android, iOS, or embedded systems. Additionally, it lacks a dedicated designer for the apps you create. You can, of course, use solutions such as WYSIWYG, but such solutions won’t use the built-in features Electron provides.
Below is the HTML code of a sample application created in Electron. The main.js file has remained unchanged:
<! DOCTYPE html>
< html>.
  < head>
    < meta charset="UTF-8">
    <!-- https://developer.mozilla.org/en-US/docs/Web/HTTP/CSP -->
    < meta http-equiv="Content-Security-Policy" content="default-src 'self'; script-src 'self'; style-src 'self' 'unsafe-inline'">
    < link href="./styles.css" rel="stylesheet">
    < title> Example App</title>.
  </head>
  < body>
    < div style="text-align: center; margin-top: 25%;">
    < h1> Hello World! </h1>
    < br>
    < img src="ss.png" alt="electron">
  </div>.
    <!-- You can also require other files to run in this process -->
    < script src="./renderer.js"></script>
  </body>
</html>.
This is what our application looks like after launch:

Flutter is another cross-platform desktop framework for software development. It is an open-sourced project created by Google in May 2017. Flutter was initially targeted exclusively at mobile platforms. Support for desktop platforms was introduced only in 2020.
Programming applications in Flutter requires knowledge of Dart, Google’s proprietary programming language. It is a universal, strongly-typed object-oriented language. It can seem a bit difficult to the novice programmer, so it’s important to learn it before you start developing applications in Flutter. Flutter programming is primarily based on using components called widgets. Widgets can be either stateless, meaning that they cannot be changed at runtime, or they can be stateful, meaning that we can change their appearance at runtime. However, it is important to keep in mind, that such a change renders the element completely from scratch – this can have an impact on performance.
Similar to Qt, Flutter allows us to integrate our code with the native functionality of the target system, like Bluetooth, GPS, etc.but unlike in Qt, however, you have to use special libraries created by the community to do so – in the Qt framework, most of them are already built-in.
To create a project in Flutter, run the file flutter_console.bat. The program will then guide you through the process of creating the project. The implementation of the appearance and logic is contained in the main.dart file. After creating the application, we can build it for both web and mobile platforms. In the case of desktop platforms, the matter is a bit more complicated, because here we have to download the appropriate packages first, and also properly configure the project to be ready for release to desktops.
One of the biggest drawbacks of Flutter is the quite large size of the final package. An application created in Flutter, for example, which takes up 2MB, would take up 200-400KB of disk space in other technologies. Another problem is the youth of this framework, and the small number of built-in libraries. Also, since Flutter is a framework from Google, they pay more attention to improvements targeting Android than iOS.
Below you will find sample code for an application created in Flutter:
import' package:flutter/material.dart';

void main() {
  runApp(const MyApp());
}

class MyApp extends StatelessWidget {
  const MyApp({Key? key}) : super(key: key);

  @override
  Widget build(BuildContext context) {

  Map< int, Color> color =
  {
50    :Color. fromRGBO(29,202 , 155, . 1),
100    :Color. fromRGBO(29,202 , 155, . 2),
200    :Color. fromRGBO(29,202 , 155, . 3),
300    :Color. fromRGBO(29,202 , 155, . 4),
400    :Color. fromRGBO(29,202 , 155, . 5),
500    :Color. fromRGBO(29,202 , 155, . 6),
600    :Color. fromRGBO(29,202 , 155, . 7),
700    :Color. fromRGBO(29,202 , 155, . 8),
800    :Color. fromRGBO(29,202 , 155, . 9),
900    :Color. fromRGBO(29,202 , 155, 1),
  };
  return MaterialApp(
      title: 'Scythe Demo',
      debugShowCheckedModeBanner: false,
      theme: ThemeData(
        primarySwatch: MaterialColor(0xff1dca9b, color)
      ),
      home: const HomePageClass(displayText: 'Hello world'),
    );
  }
}

class HomePageClass extends StatefulWidget {
  const HomePageClass({Key? key, required this.displayText}) : super(key: key);

  final String displayText;

  @override
  State< HomePageClass> createState() => _HomePageClassState();
}

class _HomePageClassState extends State< HomePageClass> {

  @override
  Widget build(BuildContext context) {
    return Scaffold(
      body: Center(
        child: Column(
          mainAxisAlignment: MainAxisAlignment.center,
          children: < Widget>[
            Text(widget.displayText),
            Image. asset('assets/images/ss.png'),
          ],
        ),
      )
    );
  }
}
This is how it looks like after launch:

With this technology, we end today’s review of 4 of the best cross-platform desktop frameworks. Choosing a particular framework from those given can be difficult, and as you noticed each of them has its own advantages and disadvantages. Well, the choice mostly depends on your expectations and goals. We’ve prepared for you a comparison table, as well as sample cases and the best-suited frameworks:
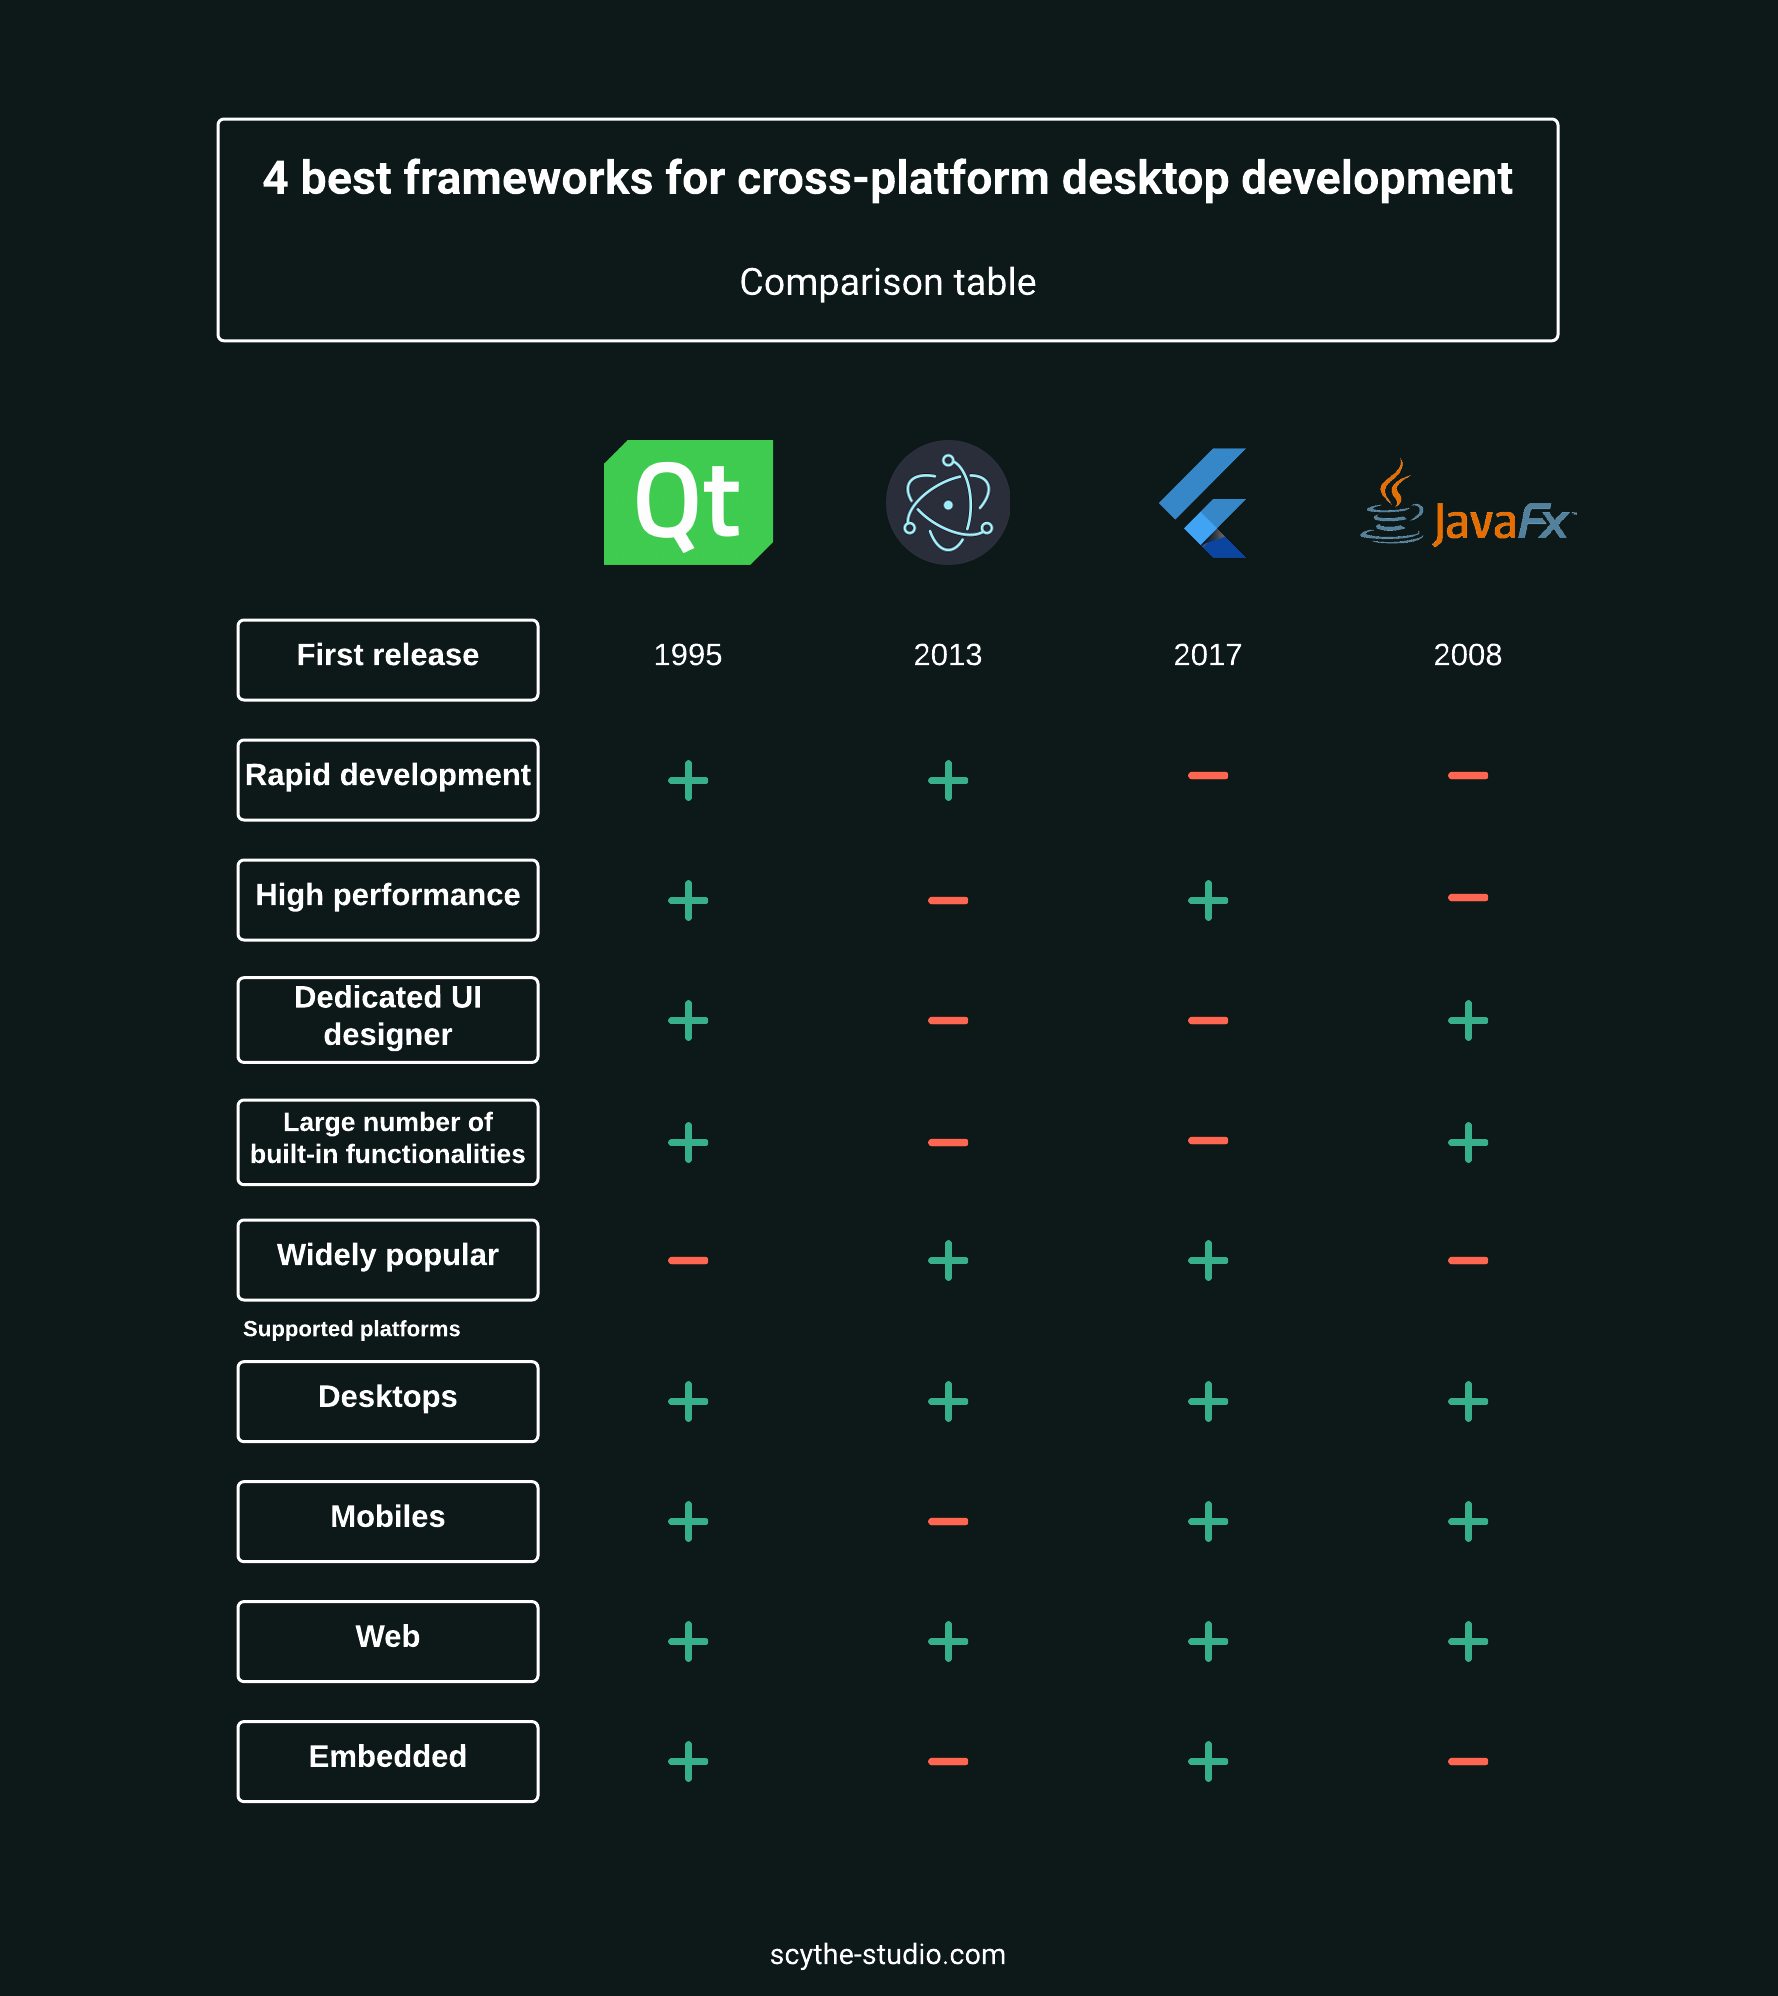
If you want your application to be accessible simultaneously on web browsers but also on personal computers, then Electron is the best choice. It will allow you to create your application in pure HTML, CSS, and JavaScript so that later you can easily reuse the code you’ve created for your website. This works both ways – if you already have the code for the website, all you need to do is make a few modifications to the code and you can port it to a desktop application.
If you are planning to release an app that will be available for desktops and mobile devices, then you should consider using Flutter. Although desktop support is quite young, it is relatively easy to release mobile apps using it. When creating software, you can also take advantage of the support of Flutter’s extensive community.
An alternative to Flutter is to use JavaFX, in which it is somewhat easier to create a desktop application using, for example, Scene Builder. Additionally, in JavaFX, you can freely use many of the available third-party solutions, which unfortunately are few in the case of Flutter. One thing to keep in mind, however, is that JavaFX programming isn’t so effective. Moreover creating dynamic, advanced UI may turn out to be difficult. Besides being popular so far, we do no not recommend using it for future projects as this technology is rather song of the past.
If you want your application to be as efficient as possible, as well as available for desktops, with the ability to easily add support for other platforms like mobiles – choose Qt. The Qt Quick module will allow your team to quickly create an amazing UI, and when combined with logic created in C++, it will ensure that created software runs lightning fast. Qt also allows you to inject native code into the code of the application, so you can take full advantage of the customer’s computer capabilities. It is also worth mentioning here that implementations of this type of injection are often already ready as open-source projects on the Internet. You may also find that you don’t need this type of injection at all – there are many ready-to-use modules in Qt that will allow you to use popular solutions like Bluetooth easily, GPS, cameras etc.
That would be it. If you are interested in a cross-platform desktop application development service, check out what we can do for you or book a free consultation right away.
Let's face it? It is a challenge to get top Qt QML developers on board. Help yourself and start the collaboration with Scythe Studio - real experts in Qt C++ framework.
Discover our capabilities
I’m not going to lie, a lot of the projects we do at Scythe Studio are related to the medical […]

Trading software refers to the digital platforms and systems that enable investors and financial institutions to buy, sell, and manage […]

Verification and Validation (V&V) are two pillars that ensure a medical device is safe, effective, and compliant before it ever […]