How to use Qt WebAssembly – The Complete Guide with demo
Hey, welcome back to another blog post. Today we’re going to talk about the new Qt WebAssembly. This post will […]

Join us at Qt C++ Warsaw Meetup - 21.08.2025
Sign up for free!
Regular readers of our blog, know that we try to write posts on various topics related to programming in Qt and beyond. Today we’re going to go a little beyond programming and focus on a topic more closely related to the operating system and embedded industry. So welcome to another interesting journey!
Today we are going to take Yocto Linux, a topic very close to the embedded community. We will take a look at what it is in general and how to use it. However, let me say at the outset that this post will be more about the whole Yocto Linux concept in general and not a tutorial on how to build your custom image. But who knows, maybe there will be a more tutorial post soon 😎. Stay tuned!
However, if you have any problems with your project in which you use Yocto Linux, feel free to contact us.
Without further ado, let’s get started!
Before we get to the heart of this post, which is Yocto Linux, it is worthwhile to know/remember what an operating system is. I know that the subject seems trivial to many of you, but it will help us to build a foundation for further learning.
An operating system (OS) is software that acts as an intermediary between the user of a computer (or other device, such as a smartphone or embedded device) and its hardware. The main tasks of an OS are to manage the computer’s hardware architecture resources, such as the processor, memory, disks, and input and output devices, and to provide basic services for applications.
So we have a diagram like the one presented below. The user most often uses applications on the device that run on the operating system, thanks to which they have access to the physical resources of the computer (yes, I know, a strong simplification 😅)
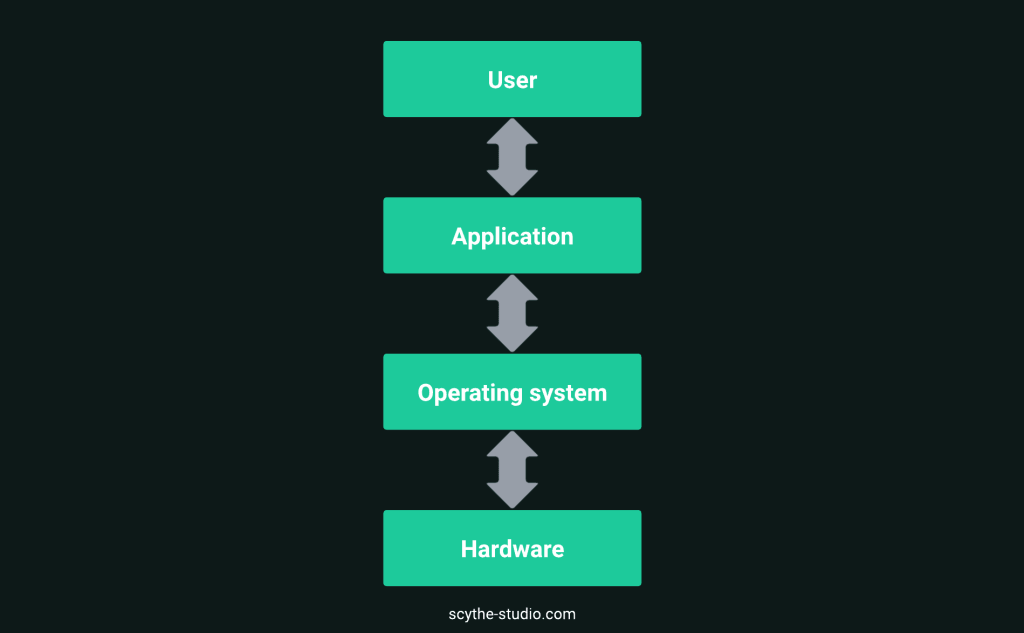 Simple diagram of typical system and hardware architecture
Let’s discuss further what types of operating systems we have. Searching the Internet, I came across many definitions, including some that I have heard of for the first time! Therefore, I have decided to discuss only 3 of them which I consider to be the most popular.
Multitasking operating systems: Allow multiple tasks (programs) to be executed simultaneously by a user or multiple users. Examples include Windows, macOS, or Linux. They allow CPU time to be shared between several processes so that the user can work on multiple applications simultaneously.
Real-time operating systems (RTOS): These are systems designed to support applications that require rapid responses to external events within a specified, guaranteed time. They are mainly used in embedded systems such as industrial controllers or medical devices.
Mobile operating systems: Specifically designed to support mobile devices such as smartphones and tablets. They are optimized for touch interfaces, wireless communication, and battery life. Among the most popular are Android and iOS.
As you can see, thanks to the variety of operating system types, we can find applications for a variety of fields. It would be pointless if there was only one for everything. As they say, if something is for everything, it is for nothing 🧐
There are many Linux distributions, often referred to as ‘distros’, which are tailored to suit different user needs. These distributions may differ in their default desktop environment, set of pre-installed software, package management system, and community support. Here are some of the most well-known Linux distributions:
Ubuntu: One of the most popular Linux distributions, known for its ease of use and extensive support. Ubuntu is a good choice for both beginners and advanced users.
Debian: Considered one of the most stable distributions, it is also the base for many other distributions, including Ubuntu. Debian is renowned for its rigorous package testing process.
Fedora: Known for staying up to date with the latest technologies, Fedora is often used by IT professionals and developers.
CentOS (until recently): This was a free derivative distribution of Red Hat Enterprise Linux (RHEL), valued for its stability and security in server environments. The project has now transitioned to Arch Linux.
Arch Linux: A distribution for advanced users who want complete control of the system. Arch is known for its simplicity and KISS (‘Keep It Simple, Stupid’) philosophy.
Linux Mint: A very user-friendly distribution that is based on Ubuntu. Known for its ease of use and aesthetically pleasing desktop environment.
As you can see, there are distributions to choose from. But what if this choice is not enough for you, what if you want to go deeper…?
Typical Linux distributions, such as Ubuntu, Fedora, or Debian, are designed for general-purpose use on desktops, laptops, or servers. While technically possible to use in embedded devices, there are several reasons why they may not be the best choice for embedded Linux distribution:
Size: Standard distributions include many packages and services unnecessary for embedded environments, leading to unnecessarily large system images. In embedded Linux systems, where disk space is at a premium, wasting space on unused features is undesirable.
System Resources: These distributions are designed to offer rich user environments and broad functionality, which can result in higher consumption of system resources like CPU and RAM. Embedded Linux systems often have limited resources, so minimizing resource use is crucial. This factor is decisive in terms of both embedded and IoT devices.
Hardware Optimization: Standard distributions are not typically optimized for the specific hardware used in embedded Linux systems. Such optimization is critical for achieving maximum performance and energy efficiency. Again, important for embedded and IoT devices.
Release Cycles: The release cycles of standard distributions may not align with the requirements of embedded projects, which often need long-term support and stability. Embedded Linux systems need to be reliable for many years, while standard distributions may rapidly move to new versions, making maintenance challenging.
Security and Updates: Managing security and updates in standard distributions can be challenging in embedded environments, especially where network updates are difficult or impossible. Embedded Linux systems often require specific, controlled update environments.
Application-Specific Needs: Embedded Linux system designers often need full control over the operating system components to tailor them to the specific needs of their application. Standard distributions may not always offer sufficient flexibility in configuration. Moreover, sometimes we need to even touch the Linux kernel!
So you can see that we have a lot of things to worry about, but is there a solution that meets all your needs…?
 One Linux to rule them all?
The Yocto Project is an open-source initiative that provides tools and frameworks for creating custom Linux distributions (specifically embedded Linux distributions). The project was initiated in 2010 by the Linux Foundation as a way to standardize the process of developing embedded systems across different hardware platforms. I don’t think I’d be lying if I said it is one of the more popular open-sourced projects under the banner of the Linux Foundation!
 Yocto Project official logo
The history of the Yocto Project begins with the need to create a coherent, flexible environment for building software for embedded devices that could support a diversity of hardware architectures and application requirements. Over the years, the Yocto Project has gained broad recognition and support in the industry, becoming the standard for creating custom operating systems for a wide range of devices, from simple gadgets to sophisticated industrial and commercial customized systems.
The Yocto Project is not an operating system itself but a set of tools that allow developers to precisely configure, compile, and deploy their versions of Linux, tailored to the specific requirements of their projects. So as you can see, it is the perfect solution for many embedded developers!
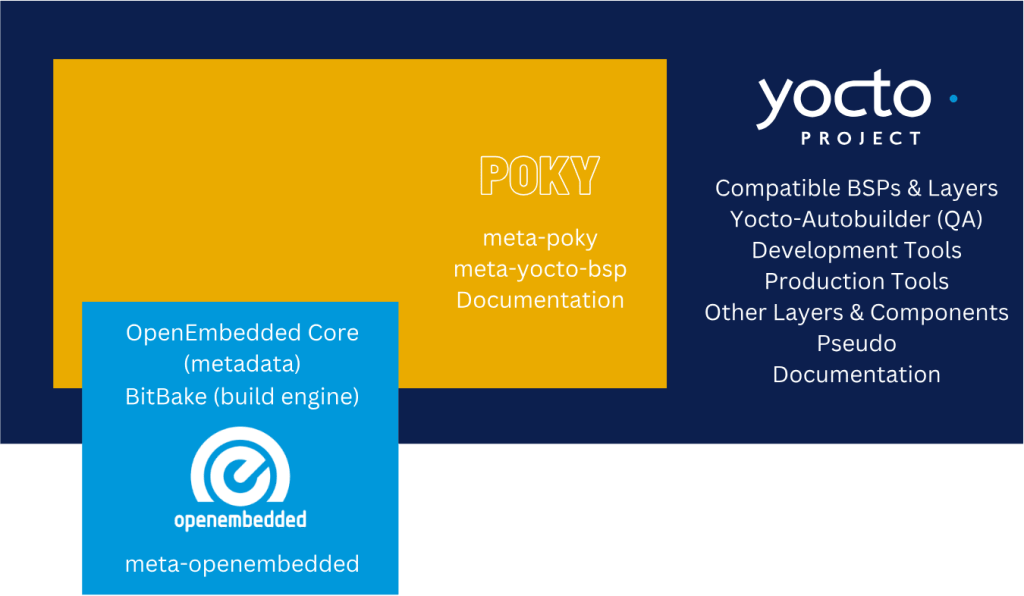
Time to get to the meat of this article 😉 Let’s first start by discussing the architecture of the entire Yocto Project. We will be based on images from official documentation.
Going from the ‘outside’ we have the Yocto Project “layer”, which has already been discussed to some extent. It simplifies the process of developing and maintaining a complete Linux distribution for embedded systems, offering a flexible set of scripts and metadata to generate own distributions tailored to specific needs.
Next, we have Poky which is the reference distribution of the Yocto Project. It includes the OpenEmbedded build system, which is the core engine for building distributions, as well as a set of metadata that defines the core packages and recipes for the base system. Poky serves as a starting point for developing your own custom Linux distribution.
Metadata in the Yocto Project includes recipes, classes, and configuration files that define how software packages are built and how they should be included in the final image. This metadata is organized into layers, with each layer serving a specific purpose or catering to specific embedded hardware or software needs.
Recipe Files are one of the core components of Yocto’s metadata. They contain instructions for downloading, configuring, compiling, and installing software packages into the final image. Recipes also handle patch applications and define package dependencies.
Layers are collections of related metadata that modularize and organize the configuration and build instructions. This allows for better management of dependencies and customizations. Layers can be specific to hardware (BSP layers), software features, or application requirements.
Finally, we have an OpenEmbedded layer consisting of OpenEmbedded Core and BitBake.
OpenEmbedded Core (OE-Core) is a subset of the OpenEmbedded project, which provides a layer of metadata used by the Yocto Project. OE-Core contains the base set of recipes, classes, and associated files for building basic Linux features and serves as the foundation upon which additional layers and customizations can be built.
BitBake is a task executor and scheduler used to perform the builds. It reads the metadata (recipes and configurations) and executes the tasks required to build the specified target. BitBake handles dependency resolution, task scheduling, and execution, making it a central component of the Yocto Project build system.
Board Support Packages (BSPs) in the Yocto Project are crucial components that allow Linux systems to be customized for specific hardware platforms. They include drivers, kernel configurations, bootloaders, and other elements necessary for the OS to operate on a given device. BSPs enable developers to adapt the Linux system to diverse hardware requirements efficiently, facilitating the development of embedded projects tailored to specific needs.
For example, if you’re developing a Linux-based system for an STMicroelectronics STM32 microcontroller board, you would use a BSP specifically designed for the STM32 family. This BSP would include all necessary components such as peripheral drivers (for GPIO, UART, I2C, etc.), the STM32 kernel configuration, and the bootloader setup tailored for STM32 devices.
Uff sounds complicated, right? To make things a little easier for you I will try to describe the whole Yocto Linux development process in a little simpler words along with a simpler diagram 😅.
When I describe something, I like to bring up culinary comparisons, so I’m going to try it now too 😎
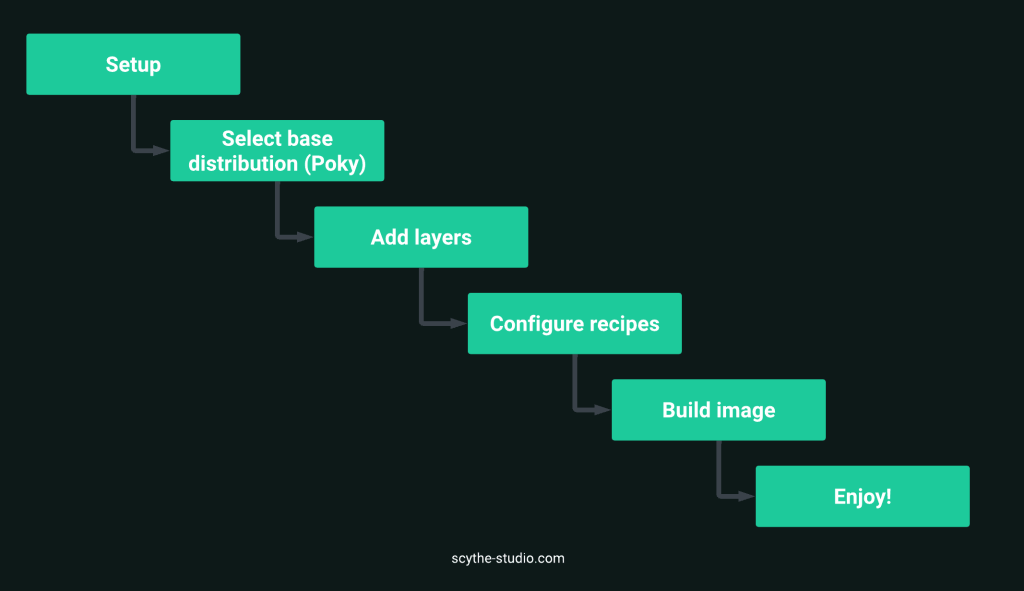 Let’s try one more time
Setup: You start by specifying the target hardware for which you want to build the operating system. Then, you’ll need to get your development environment ready. This means installing the Yocto Project and making sure you have all the necessary dependencies on your computer. It’s like setting up your kitchen before you start cooking.
Select Base Distribution (Poky): Think of Poky as your starting point or the base dough of your project. It’s the reference distribution of the Yocto Project and comes with the basic software and libraries you need to bake your custom operating system
Add Layers: Layers in Yocto Project let you add extra software and configurations specific to your project. You can use existing layers created by others or make your own. It’s similar to choosing your toppings for a pizza to make it just the way you like it 🍕
Configure Recipes: Recipes tell the Yocto how to build your software. You define recipes for the applications and system components you want in your distribution. It’s like following a cooking recipe to ensure you get the result you’re aiming for.
Build Image: You initiate the build process, during which BitBake, Yocto’s build system tool, analyzes the recipes, resolves dependencies, and compiles the software, creating an operating system image. Time for baking! 😋
Enjoy!: After building, you can test the image on your target hardware or using an emulator to ensure everything works as expected. If you need to make changes, you can modify the configuration, recipes, or layers, and then re-initiate the build process to generate an updated system image. Once satisfied with the outcome, the operating system image can be deployed on the target devices, ready to be eaten used!
OK, I have cited a lot of theory but what about practice? Maybe some example?!
As I mentioned, today’s blog post is more general in terms of the Yocto Project. However, if you want to test how it all works, I recommend you do as I did, i.e. build a sample system image, following the instructions in the official Yocto Project documentation.
The first step is to prepare our environment. Let me start by saying that Linux users have it easier because they can go straight to downloading the necessary components. For users of other systems, you can either :
Use CROssPlatformS (CROPS) – which is a Docker container for short…
…use WSL2 if you are working on Windows – I used this option 😉 (Installed Ubuntu)
Before you start work, familiarise yourself with the requirements. Building your custom system image can consume a lot of disk space!
Ok, let’s assume you already have the environment, now all you need to do is initialize the build environment with Poky:
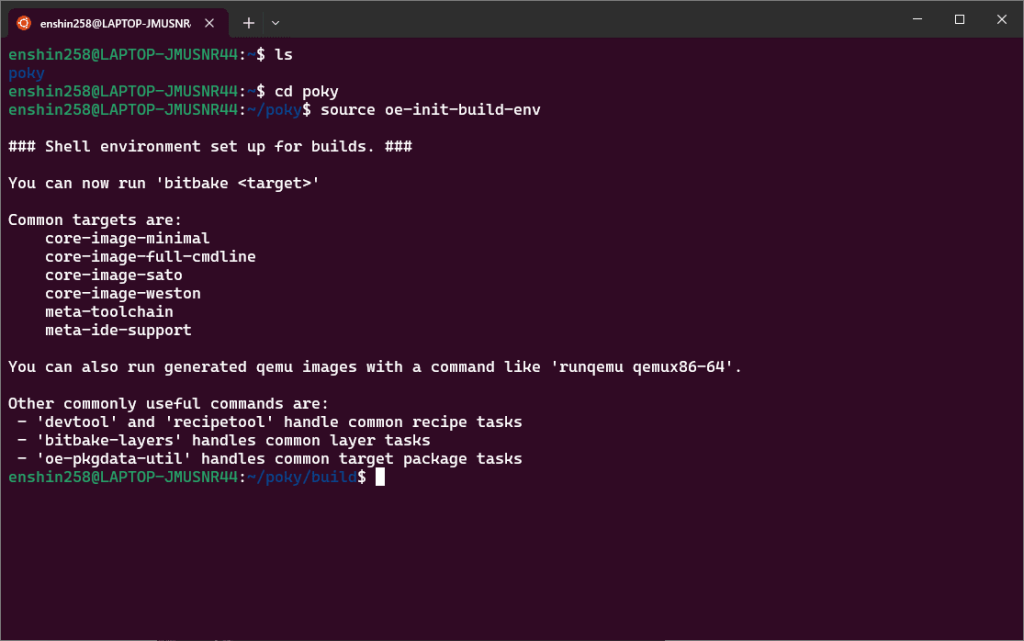 Output of source oe-init-build-env command
You can now proceed to build a sample image using the bitbake core-image-sato command:
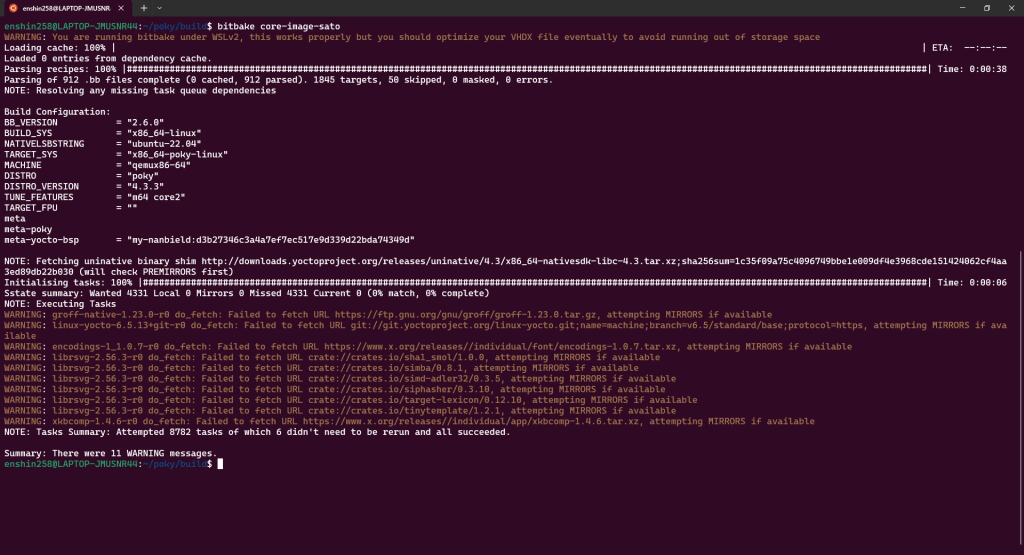 Be patient, depending on the hardware you are building on, this process can take up to several hours!
After build finish, you can test your result wit runqemu qemux86-64 command:
 The slow startup process is due to the fact that I am running Linux in Linux 😉
That’s it for today’s blog post, I hope you enjoyed it, who knows maybe this is just the beginning of the vast topic that is Yocto Linux and maybe there will be even more content 🧐


Let's face it? It is a challenge to get top Qt QML developers on board. Help yourself and start the collaboration with Scythe Studio - real experts in Qt C++ framework.
Discover our capabilitiesHey, welcome back to another blog post. Today we’re going to talk about the new Qt WebAssembly. This post will […]
Users of embedded devices – from industrial controllers to consumer electronics – are often unaware of hidden vulnerabilities that threaten […]

Graphical user interfaces (GUIs) are becoming more and more important in embedded devices – from home appliances to medical equipment […]