
Trading Software Development: A Comprehensive Guide
Trading software refers to the digital platforms and systems that enable investors and financial institutions to buy, sell, and manage […]

Join us at Qt C++ Warsaw Meetup - 21.08.2025
Sign up for free!
Welcome you to another post on our blog. Perhaps some of our regular readers will notice that they’ve seen the title of today’s post before. And they are right. 😉 At the end of 2020, I wrote an entry on interfacing Java android code with Qt. You can find that entry here.
It’s been a while since that blog post was released and a lot has changed. With the entry of Qt 6, many of the “extras” modules (including the Qt Android Extras module) have been standardized or moved. In addition, Qt suggests that you should replace qmake in your projects in favor of CMake.
Therefore, I decided to “refresh” that blog post. Knowledge of how to call Java functions, and communicate with custom Java classes is the essence of building Qt Android apps. It’s also a must to use Android API and native functions.
If you haven’t read the previous post, I highly encourage you to do so. The general idea of how to call code from Java file in Qt has remained the same so I will build heavily on the previous post (but that doesn’t mean it will be the same). So if you are already after reading the previous entry then let’s get started!
In a previous blog post, we used Qt 5 and qmake. At that time, in order to be able to call Android Java code in Qt we had to use a module called Qt Android Extras. With the advent of Qt 6, however, this module was removed.
You might have thought to yourself, “Wait a minute, what do you mean removed! How am I even supposed to do that now?!”. Rest assured, the people at the Qt Group have a head on their shoulders 😉 Qt’s strength was that it was always cross-platform. Therefore, in order to maintain some kind of consistency, it was decided to remove the “Extras”
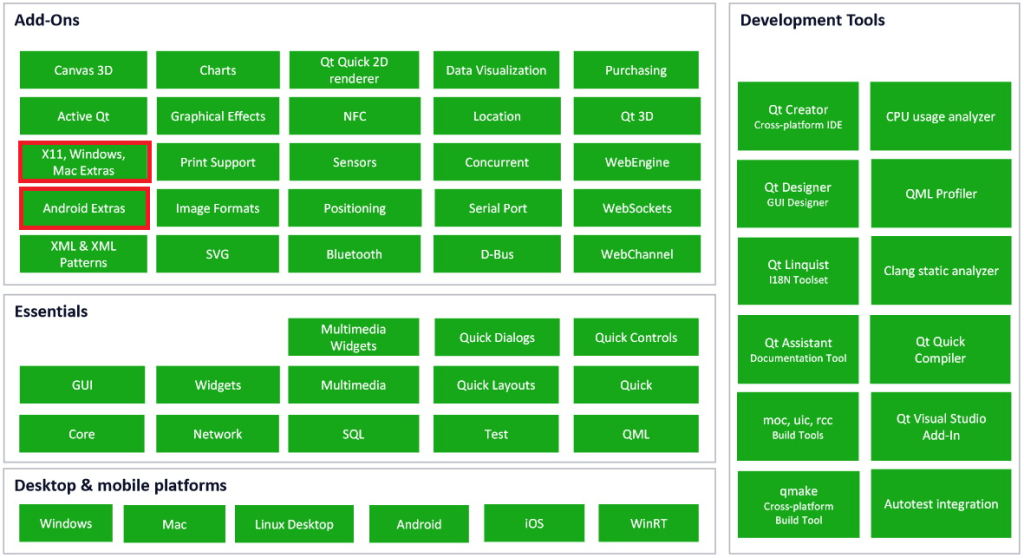
However, in order not to spoil the existing solutions, it was decided to replace them with similar functionality only in other modules (if you want to read more about it, I recommend taking a look at this post.
The QAndroidJniObject and QAndroidJniEnvironment classes of interest have been replaced by QJniObject and QJniEnvironment. By the way, JNI is an acronym for Java Native Interface. If you take a look at the official documentation, you will notice that they provide exactly the same functionality. You can also see that consistency has actually been improved.
Well, after all, since Qt is multi-platform, why is the name “Android” in the class name, which is not as misleading, implying that you can only call Java code from Android (and yet we can call Java native code that has nothing to do with Android Java methods).
In the previous post, I presented how to call a simple Java function from Java class in Qt and then showed an example of an Android application that automatically adjusts the light/dark mode depending on the battery level. All of that using Java Native Interface (JNI).
This time we will use a different functionality. We will create an application that displays received SMS messages. Please remember that this application is for educational purposes and does not have to represent any real business value 😉.
Let’s first start with the structure of our project. First, we create an empty QML application project and then add the src/com/ScytheStudio folder where we create the SmsReceiver.java file. The format of this path is due to the default Java nomenclature. So let’s see what our Java code should look like.
package com.ScytheStudio;

import java.util.List;
import java.util.ArrayList;
import android.content.BroadcastReceiver;
import android.content.Context;
import android.content.Intent;
import android.os.Bundle;
import android.telephony.SmsMessage;
import android.util.Log;

public class SmsReceiver extends BroadcastReceiver {
    public static List<String> messagesList = new ArrayList<String>();

    @Override
    public void onReceive(Context context, Intent intent) {
        if (intent.getAction() != null && intent.getAction().equals("android.provider.Telephony.SMS_RECEIVED")) {
            Bundle bundle = intent.getExtras();
            if (bundle != null) {
                Object[] pdus = (Object[]) bundle.get("pdus");

                if (pdus != null) {
                    for (Object pdu : pdus) {
                        SmsMessage smsMessage = SmsMessage.createFromPdu((byte[]) pdu);
                        String messageBody = smsMessage.getMessageBody();
                        messagesList.add(messageBody);
                    }
                }
            }
        }
    }

    public static String getLastMessage() {
      if  (!messagesList.isEmpty()) {
        return messagesList.remove(0);
      } else {
        return "";
      }
    }
}
Rest assured, I’m already explaining what all this does. First, we define our package, which is com.ScytheStudio. Then there is the import section where we add any necessary classes. Next, we define our SmsReceiver Java class. It extends the functionality of the BroadcastReciever class which allows us to listen for events. Next, we see the creation of a static list of String – messagesList. This is where we will store our messages. Let’s treat it as a kind of buffer used by our custom Java class.
Next, we see the overwritten onReceive function. Don’t worry if you don’t understand this Java code. In our case, this function simply calls itself every time the event we are listening for is called (retrieving SMS message). The next steps in the code make sure that we have not received any NULL objects and that we have received an event from the corresponding event. We then extract the information, decode it, and save it into our buffer.
In this class additionally, there is a method getLastMessage(), which returns the last message from the list and then deletes it. It is this function that we will call from our Qt code. After “retrieving” the message, we remove it from our buffer.
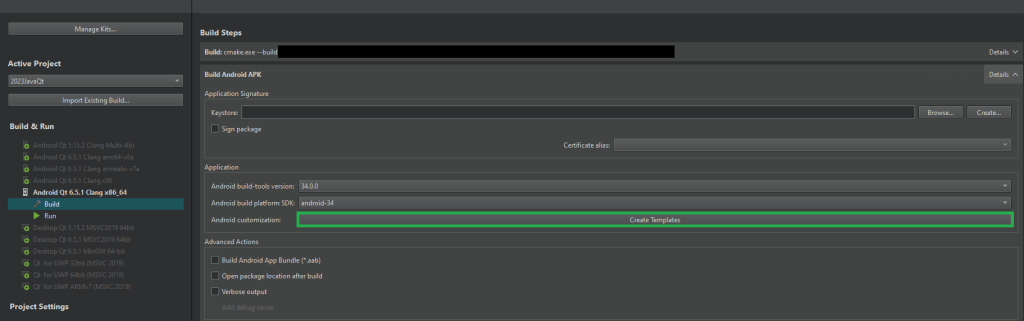
In order to be able to capture the text message receiving event, we first need to ‘register’ our receiver in some way. To do this, we need to create an AndroidManifest.xml file and add it to the Android folder. Qt Creator allows us to generate it in a simple way. All we need to do is to go to Projects->Build->Build Steps->Build Android APK and in the Application->Android Customization section click the Create templates button as shown in the graphic below:
After going through the manifest file wizard, we should get the default AndroidManifest.xml file. It now needs to be modified accordingly. We need to add the appropriate permissions so that our app can read SMS messages. To do this, we add the following entries:
<uses-feature android:name="android.hardware.telephony"/>
 <uses-permission android:name="android.permission.READ_SMS"/>
 <uses-permission android:name="android.permission.BROADCAST_SMS"/>
 <uses-permission android:name="android.permission.RECEIVE_SMS"/>
Then in the application section, we specify our class as the receiver and the event it is listening for. This looks like the following:
<receiver android:name="com.ScytheStudio.SmsReceiver" android:enabled="true" android:exported="true">
       <intent-filter>
           <action android:name="android.provider.Telephony.SMS_RECEIVED"/>
       </intent-filter>
   </receiver>
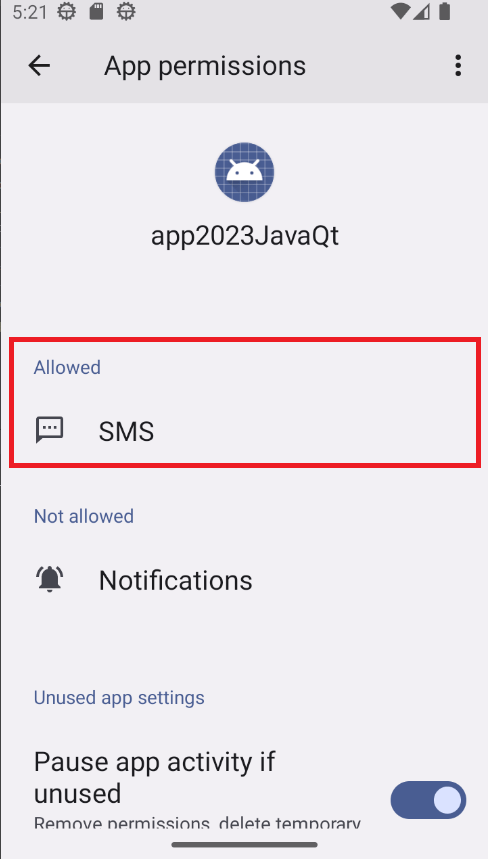
It is also important to set the right permission on your phone/emulator after installing the app (go into your phone’s settings and then find our app and give it the right permissions).
Now that we’ve got the Java part out of the way, it’s time to get down to the more fun part. 😉 Let’s create SmsReciever.h and SmsReciever.cpp files (empty for now) and add them to CMakeLists.txt in the qt_add_executable() function. In this function, let’s also add the SmsReciever.java and AndroidManifest.xml files to be part of our project. The entire CMakeLists.txt file should look like the following:
cmake_minimum_required(VERSION 3.16)

project(2023JavaQt VERSION 0.1 LANGUAGES CXX)

set(CMAKE_CXX_STANDARD_REQUIRED ON)

find_package(Qt6 6.5 REQUIRED COMPONENTS Quick)

qt_standard_project_setup(REQUIRES 6.5)

qt_add_executable(app2023JavaQt
    main.cpp
    SmsReceiver.h
    SmsReceiver.cpp
    android/src/com/ScytheStudio/SmsReceiver.java
    android/AndroidManifest.xml
    MANUAL_FINALIZATION
)

qt_add_qml_module(app2023JavaQt
    URI 2023JavaQt
    VERSION 1.0
    QML_FILES Main.qml
)

# Qt for iOS sets MACOSX_BUNDLE_GUI_IDENTIFIER automatically since Qt 6.1.
# If you are developing for iOS or macOS you should consider setting an
# explicit, fixed bundle identifier manually though.
set_target_properties(app2023JavaQt PROPERTIES
#    MACOSX_BUNDLE_GUI_IDENTIFIER com.example.app2023JavaQt
    MACOSX_BUNDLE_BUNDLE_VERSION ${PROJECT_VERSION}
    MACOSX_BUNDLE_SHORT_VERSION_STRING ${PROJECT_VERSION_MAJOR}.${PROJECT_VERSION_MINOR}
    MACOSX_BUNDLE TRUE
    WIN32_EXECUTABLE TRUE
)

set_property(TARGET app2023JavaQt APPEND PROPERTY
    QT_ANDROID_PACKAGE_SOURCE_DIR ${CMAKE_CURRENT_SOURCE_DIR}/android
)

target_link_libraries(app2023JavaQt
    PRIVATE Qt6::Quick
)

include(GNUInstallDirs)
install(TARGETS app2023JavaQt
    BUNDLE DESTINATION .
    LIBRARY DESTINATION ${CMAKE_INSTALL_LIBDIR}
    RUNTIME DESTINATION ${CMAKE_INSTALL_BINDIR}
)

qt_finalize_executable(app2023JavaQt)
What is different from the normal CMakeList.txt file created by Qt Creator are lines 17, 37 and 52. At the beginning, we add the MANUAL_FINALIZATION flag which tells CMake that the qt_add_executable() command will be “modified” in the rest of the code. Next, in line 37, we indicate where the Android files we created will be located (in our case, the android folder). Finally, in line 52 we sort of close the finalization of our executable file with the qt_finalize_executable() command.
So let’s go back to our SmsReciever.h file. In this class, we want to store all the messages in order to display them graphically in a list. We also want this list to be updated with new messages. So let’s create something like this:
#ifndef SMSRECEIVER_H
#define SMSRECEIVER_H

#include <QObject>
#include <QTimer>

class SmsReceiver : public QObject
{
    Q_OBJECT
    Q_PROPERTY(QStringList smsMessagesList MEMBER m_smsMessagesList NOTIFY smsMessagesListChanged)

public:
    explicit SmsReceiver(QObject *parent = nullptr);

signals:
    void smsMessagesListChanged();

private:
    QStringList m_smsMessagesList;
    QTimer* m_timer;
};

#endif // SMSRECEIVER_H
Our Q_PROPERTY will be of type QStringList as for the purposes of the example we are only considering text messages. Using the MEMBER flag allows us to somehow automatically create default get and set functions which reduces the amount of code we need to write. Additionally, we will create a QTimer object, which we will then use to “refresh” our message list. This is due to the fact that from the Java class level, it is not possible to emit signals as in Qt (a great pity).
As for the SmsReciever.cpp file, it should look like this:
#include "SmsReceiver.h"

#include <QDebug>
#include <QJniObject>

SmsReceiver::SmsReceiver(QObject *parent)
    : QObject{parent}
{
    connect(&m_timer, &QTimer::timeout, this, [this]() {
        qDebug() << "Checking new messages...";
        QString lastMessage = QJniObject::callStaticMethod<jstring>("com/ScytheStudio/SmsReceiver", "getLastMessage").toString();

        if  (!lastMessage.isEmpty()) {
            m_smsMessagesList.append(lastMessage);
            emit smsMessagesListChanged();
        }
    });

    m_timer.setInterval(1000);
    m_timer.start();
}
Here we see a combination of a timer signal (refreshing every second) and a custom lambda. We see here the use of QJniObject::callStaticMethod(…), so let’s try to analyze it. We try to call a static Java method (callStaticMethod()) from the com/ScytheStudio/SmsReciever class (first argument). This method is called getLastMessage (second argument). Since we know that this method returns us a String we specify the returned type, i.e. “<jstring>”, in sharp brackets (for all data types conversion, see qt documentation).
Our application is almost ready. All that remains is to modify the main.cpp and main.qml files. Since in the main.cpp file all I’m changing is creating an instance of our SmsReciever and registering it, and in the qml file creating a ListView, I’ll skip explaining the code and just show how it should look:
#include <QGuiApplication>
#include <QQmlApplicationEngine>
#include <QQmlContext>
#include <QDebug>

#include "SmsReceiver.h"

int main(int argc, char *argv[])
{
    QGuiApplication app(argc, argv);

    QQmlApplicationEngine engine;

    SmsReceiver smsReceiver;
    engine.rootContext()->setContextProperty("smsReceiver", &smsReceiver);

    QObject::connect(&engine, &QQmlApplicationEngine::objectCreationFailed,
        &app, []() { QCoreApplication::exit(-1); },
        Qt::QueuedConnection);
    engine.loadFromModule("2023JavaQt", "Main");
    return app.exec();
}
import QtQuick
import QtQuick.Window
import QtQuick.Controls

Window {
  width: 640
  height: 480
  visible: true
  title: qsTr("SmsReceiver")
  color: "#10403f"

  ListView {
    id: messagesListView

    anchors {
      fill: parent
      margins: 10
    }

    model: smsReceiver.smsMessagesList
    spacing: 5

    delegate: Rectangle {
      id: messageDelegate

      width: messagesListView.width
      height: Math.max(50, messageText.height + 20)
      color: "#218165"
      radius: 15

      Text {
        id: messageText

        anchors {
          left: parent.left
          right: parent.right
          verticalCenter: parent.verticalCenter
          margins: 10
        }

        text: modelData
        font.pixelSize: 18
        color: "white"
        wrapMode: Text.WordWrap
        horizontalAlignment: Text.AlignHCenter
        verticalAlignment: Text.AlignVCenter
      }
    }
  }
}
Now all we need to do is build our Android app and we are done. Let’s see in the gif below how it all works. For the purposes of the tutorial, it uses an Android emulator that allows you to ‘simulate’ sending a text message to the emulator. The number given is an artificial number that the emulator uses for testing.
So we can see that everything is working perfectly. That’s all for today. If you would need more professional help in this area, remember that we also do consulting. I hope you enjoyed this post. See you soon!


Let's face it? It is a challenge to get top Qt QML developers on board. Help yourself and start the collaboration with Scythe Studio - real experts in Qt C++ framework.
Discover our capabilitiesTrading software refers to the digital platforms and systems that enable investors and financial institutions to buy, sell, and manage […]

Verification and Validation (V&V) are two pillars that ensure a medical device is safe, effective, and compliant before it ever […]


From medical devices and smart vehicles to industrial controllers and consumer electronics, embedded systems are everywhere—and increasingly connected. But with […]
