
Secure Boot and Firmware Protection in Embedded Systems
Users of embedded devices – from industrial controllers to consumer electronics – are often unaware of hidden vulnerabilities that threaten […]

Join us at Qt C++ Warsaw Meetup - 21.08.2025
Sign up for free!
If we think about it for a minute, it is impossible to imagine an app without a UI. We need buttons, checkboxes, dropdown menus and much more. Almost all of these controls are created using 2D elements. However, sometimes we need to put some depth into the UI.
If you need assistance with your project, check our UI/UX design services.
During work on many different apps, I always “thought” only in 2 dimensions and it turned out to be kind of a trap. When you think about it there are plenty of cases when you need one extra dimension in your app. Let’s take the software for a 3D printer as an example. How can rendering a preview of a model to print be implemented only in two dimensions? This is why I took off in search of a solution that will allow me to create 3D elements in my applications using already known technologies such as QML. In ScytheStudio we can easily deepen our knowledge in the area that interests us, what is more, we gain not only time for development but also resources.
Fortunately, there is such thing as Qt Quick 3D, which provides us with an easy high-level API for creating elements in 3D using familiar QML language. It also covers areas like animations, cameras, lightning or materials. The goal of QtQuick 3D is to provide tools for programmers without in-depth knowledge of complex computer graphics.
A solution that doesn’t flood you with complicated mathematical formulas right at the start and fits my technology stack perfectly caught my attention right from the bat. My name is Vins and in this post, I will share, with you, my first impressions on exploring the topic of QML 3D.
First, if you do not know Qt framework and what features it contains, check out our blog post about Qt and how to create GUIs using it.
I eagerly started by going through the documentation and watching video tutorials. After a short introduction to the world of Qt Quick 3D, I decided to start a simple project. The first thing I had to do was downloading the Qt3D module through the maintenance tool, as it is not included in the core module. After that, you just need to add an import statement in the QML file and voilà, you can start using Qt Quick 3D!
Below you can see my first program created using Qt Quick 3D. The lack of fluidity is due to the necessary compression of the GIF file.
import QtQuick 2.15
import QtQuick.Window 2.15
import QtQuick.Controls 2.15
import QtQuick3D 1.15
import QtQuick3D.Materials 1.15
import QtQuick3D.Helpers 1.15


Window {
  id: root

  width: 640
  height: 960
  visible: true
  title: qsTr("QML 3D")

  View3D {
    id: view
    anchors.fill: parent

    environment: SceneEnvironment {
      clearColor: "#112220"
      backgroundMode: SceneEnvironment.Color
    }

    Node {
      id: scene

      PerspectiveCamera {
        id: camera
        z: 300
      }

      DirectionalLight {
        z: 400
        brightness: 100
      }

      Model {
        source: "#Cube"

        materials: DefaultMaterial {
          diffuseColor: "green"
        }

        PropertyAnimation on eulerRotation.x {
          loops: Animation.Infinite
          duration: 5000
          to: 360
          from: 0
        }

        PropertyAnimation on eulerRotation.y {
          loops: Animation.Infinite
          duration: 5000
          to: 360
          from: 0
        }
      }
    }
  }
}
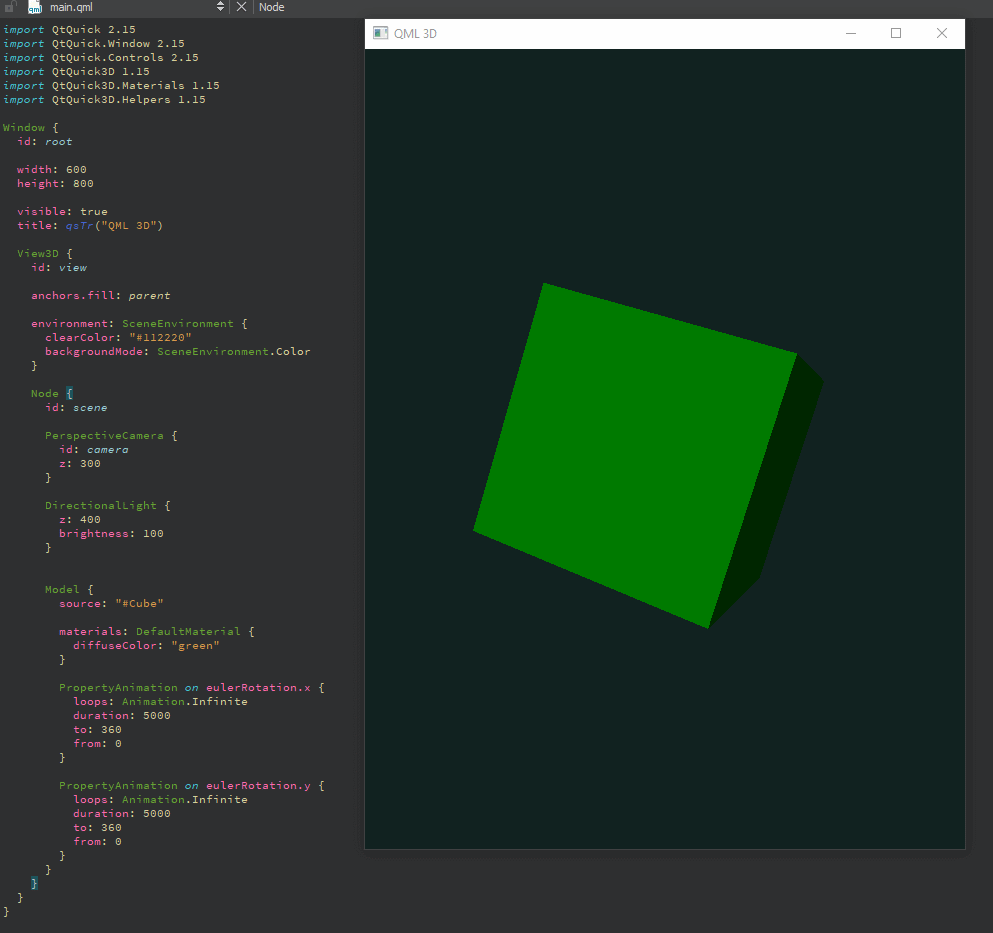
It may not look spectacular, but for 30 minutes of work, I’m proud of the results 😉
At the beginning of the project, you can see the initialization of a standard Window item. Next in the hierarchy is the View3D object. This is, so to speak, the root object for all 3D elements. I replaced the default environment attribute with a custom SceneEnviorment, with a custom background colour.
Next, you can see an object of the Node type, i.e. a class from which all Qt Quick 3D elements derive. In its body, I placed 3 elements: PerspectiveCamera, DirectionalLight and Model. Let’s analyse them one by one:
PerspectiveCamera provides us with a “view” of the entire scene. It is an eye through which we observe the scene.
DirectionalLight illuminates our whole scene. It is important not to forget about this element because without light most objects will be black (humans perceive colours because the light that bounces off materials is making us see colours).
Model is a physical object that we create. In this example, I used the built-in cube object and the default material which I changed to green. In order to make the cube move, I added two animations that change the rotation of the cube along the X and Y-axis.
As we covered the basics, it’s time for something more difficult. Reading the documentation I found out that Qt Quick 3D supports using models created in applications like Blender, Maya or 3ds max. To import such a model, we need to convert them to QML code first. You can check our blog post about writing clean QML code. To do that we will use the built-in Balsam Asset Import Tool (It is located in the path: Qt/Tools/QtDesignStudio-XXX/qt5_design_studio_reduced_version where XXX is your actual QtDesignStudio version code). To demonstrate how this works, I created a simple “house” model in Blender.

Blender is a free solution with which anyone can become an architect
As we now have a model we can use the previously mentioned Balsam. After running it we get a .qml file that is able to be used in our program. A command for running it looks as follows:
balsam [options] source_file_name
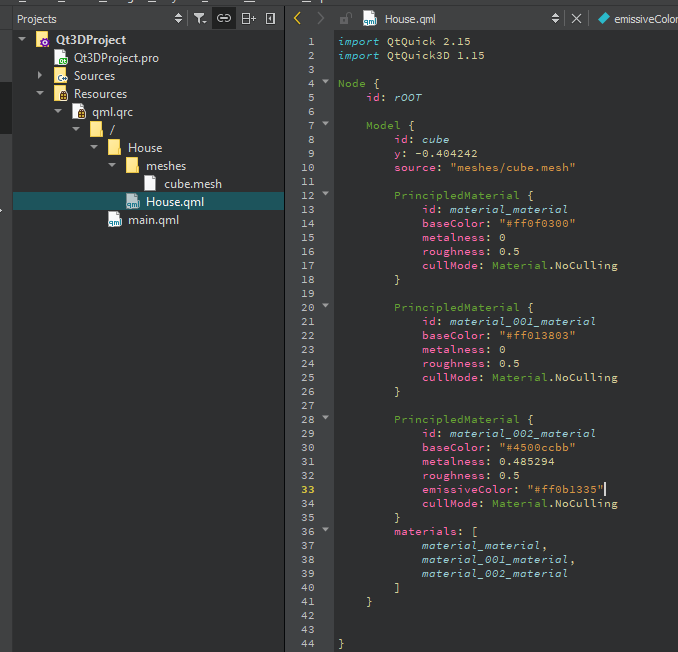 Our “house” after conversion to QML
I decided it was time to gather all the knowledge and create something more interesting.
The first thing was to add a sphere object to imitate the sun. To do this I used a Model object with source set to #Sphere and yellow colour. Inside it, I added the PointLight item which was responsible for the sun rays.
Next, I added a side menu allowing me to rotate the “house” on all axes, move the sun model, change the strength of its light, and two switches allowing me to turn off the scene light and the sun.
In order to add more interactivity to the application, I used the WasdController allowing me to move around the scene using the keys on my keyboard.
 Home, sweet home
I must admit I was very positively surprised by Qt Quick 3D. As a person without any experience in 3D graphics, I was able to understand its mechanics and use it for my needs. The extensive documentation was helpful here, including examples and sample codes.
Moreover, the set-up itself was straightforward. All you had to do was download the appropriate library using the Qt maintenance tool and use it in your project. Everything you need in one place. There was no need to reconfigure the whole project or complicated attaching of files.
The thing that captivated me most was the simplicity. The high level of abstraction makes it easy to combine 2D interface elements with 3D objects without having to change my way of thinking.
Of course, the examples presented in this article might not be very ambitious, but they are simple examples that allow feeling satisfied. I also encourage you to try your hand with Qt Quick 3D package. You will be surprised how easy and fun it is.
If you would like to read a similar article – feel free to email us with your ideas. Who knows, maybe your idea will inspire us to create another article? Take care and stay tuned 😉


Let's face it? It is a challenge to get top Qt QML developers on board. Help yourself and start the collaboration with Scythe Studio - real experts in Qt C++ framework.
Discover our capabilitiesUsers of embedded devices – from industrial controllers to consumer electronics – are often unaware of hidden vulnerabilities that threaten […]
Graphical user interfaces (GUIs) are becoming more and more important in embedded devices – from home appliances to medical equipment […]

Technical managers in the embedded space often face a classic challenge: integrating industrial communication protocols into modern applications. One such […]
